|
|
Post by barten on Jun 2, 2015 10:06:05 GMT -5
this thing was a monster to get downstairs ... if we ever decide to sell our house it will convey !!... lol... this is much better ... ... still working on the remainder of the room ... BEFORE -  AFTER -  What a difference....it looks great... huge transformation...you guys are really shaming me into working on my mess of a toy room now... lol This looks great and is exactly what I'm going to do... .can we see it opened with the spray booth in it? Fantastic! GB barten |
|
|
|
Post by bubbajoe on Jun 3, 2015 13:34:43 GMT -5
I was hoping quite a bit more for "inspiring others" than "shaming others" ... so no fair bad-mouthing your work areas, guys! If you're getting work done in your current working area, that speaks for itself. The rest is just minor adjustments, here or there. And with all of the creativity on open display, around here, there's plenty of ideas floating around, to give a person some food for thought. Something I used to tell people, back in the early 1990s when I was still using a 386 (an early type of a modern-day Personal Computer) while most of the market was hyping the 486 machines, and up, was that "William Shakespeare only had a bottle of ink and a sharpened feather; and look at what he did with it." (Sales people, in particular, had no idea whatsoever what to say to THAT! Heehee!) To me, where shop upgrades go, I feel the goal should be what StarryEyes said: to make the area more likable. And that covers a lot of ground. That could be anything from giving the area a good cleaning, to decorating differently, to changing the way things are ordered in the area, and on and on ... to scrapping everything that's not working, and replacing it. But if you're getting stuff done in that area, or have in the past, that's a very good sign. The rest is sorta just "bonus points". maybe shaming is not the correct word...inspiring..hmmm...ok..inspired  ..i hate to admit it but i will tend to be a hoarder...(guess admitting it is half the battle)...i'm always on the lookout for bits and pieces i can use in my modeling and i tend to save things most people would consider junk or trash...i store it away like a crazed squirrel ..,,pen caps.tubing.computer boards,pieces of wood. and stone , phones i have taken apart, caps and tops off bottles, wire. ect..ect...ect..i see turrets and fuel lines and engine components...but it does pile up and man has it ever piled up...good thing my wife pretty much leaves my toy room alone ..but i know i need to get organized and straighten the mess out ...and this thread has definitely inspired me to do something with the space i have...right now ..it has become a bit of a chore when i get bench time...my work space is to spread out and moving back and forth from one desk to another to grab paint of some supply i needed is getting old..and once i have it i leave it were it is and it piles up on the desk..i figure i may need it again and want it close at hand..i need to reconfigure my two work benches( desk and computer desk) and move my paint rack and find a better place for the two mechanic tool chests... and reorganize them as well...then i need to tackle my supply chest...its one of those 6 draw plastic chests you buy at walmart...its crammed full of "junk".then i need to move and organize my paint cabinet..sigh....baby steps...one thing at a time...anyways thanks for the inspiration....now to just find the time |
|
|
|
Post by Starryeyes on Jun 3, 2015 15:01:51 GMT -5
I never met a modeler that wasn't a hoarder Joe!! I think that's one of my biggest problems ... A lot of my stuff doesn't go with anything else so when it comes to organizing I'm in a quandry .... And most likely ANOTHER reason I haven't touched that area yet .... Lol... I need to get my paint booth re-established in its new resting area.. I just need to dig out my 4" hole saw and make a cut for the exhaust hose... Always something to straighten and organize in the model room!! And Joe you pretty much said it all .. My wife leaves the modeling room alone ... Lol
|
|
|
|
Post by wardster on Jun 8, 2015 1:35:48 GMT -5
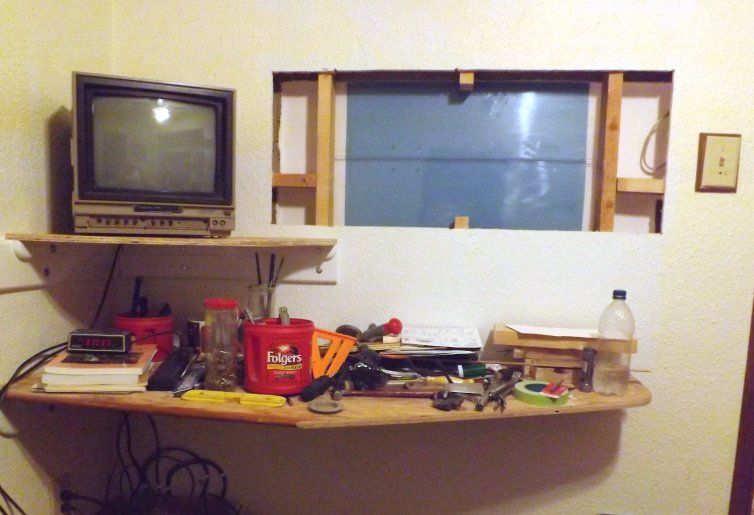
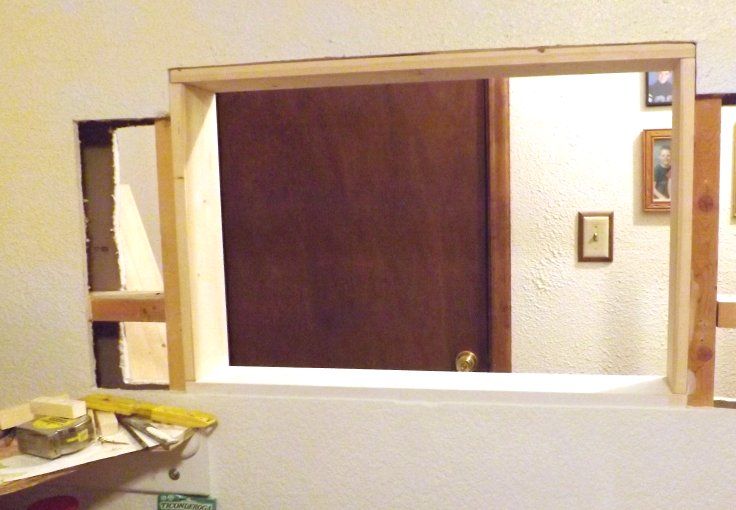
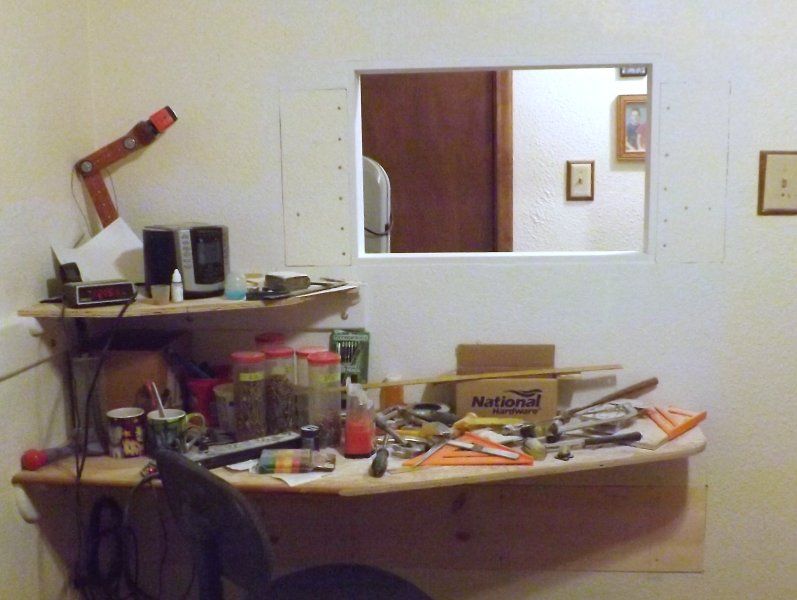
Update mode ON, as far as that big-a** hole I made in my bedroom's wall. Here's the next pic in the sequence ... mainly showing some experimentation, in terms of what might go where; and how everything might interact, etc. (Not counting the clutter ... although, knowing me, that'll likely be how the bench's top actually looks most of the time, once everything's finalized. Heehee!)  After staring at the wall, and trying out various things (paper tape-ups, along the edges, to define "how big" on the opening itself, etc.) I finally decided on a size for the window's opening, and started framing it out. Bottom board went in first; then the two sides; then the top. Carefully making, and then keeping, it all level and square, etc., with each new added piece. There's some newly-added supporting boards (not shown), located here or there, behind this wall's surface. Had to make an even bigger hole, as seen from that wall's backside, to be able to add all of the supports and what not.  And here's one last shot for today, showing the almost-completed "window opening" area.  Something else of some note: the board I mounted, under the workbench. That's the actual wall, for now. It's removable. For a while, until I know exactly where I want electrical outlets to end up, I'll use ordinary, plug-in power strips ... but once I get the ideal final outlet's locations worked out, I'll want access to that innards of that wall, to hook things up properly. For much the same reason, I haven't puttied up the gaps in the inserted sheetrock side pieces, of the window itself. They're in there with screws, for now ... so that I can remove those patch panels, if I need to. (But I probably won't. Better safe than sorry, though!?) So far, the overall "everything I've done so far" remodeling and/or "workspace upgrading" project breaks down thus: (1.) Build myself a "no-legs" table or bench top surface, with a slightly odd shape (to fit the room well), and mount that securely to the wall. (2.) Figure out what shape I'd need, for another flat / level "shelf-like" surface, above the workbench's level ... and mount that securely to the wall. (3.) Figure out what type of a window-like opening I want, and how big, and where exactly I want it ... and make a big mess, making that opening happen. The next steps will likely involve me slowing down, a bit, and actually trying out the multi-purpose hobby / entertainment set-up I've just (somewhat) finalized. Which means clearing all that clutter off, and so on, and doing a good dusting of the room and such ... and then, for a while, just "trying it all out". The purpose there is to see where I need to make any adjustments or alterations, before I make things "final-final" and permanent. Then, the next logical steps might be: (4.) Add whatever electrical power strips or outlets I feel I need; right where experience has shown me they'd be the most useful and convenient. (5.) Ditto for any added lighting. Same for any electrical stuff I'll add, that isn't strictly hobby-related: a DVD player, a cheapie radio, retro-gaming stuff ... (6.) Start adding any goofy "decorations" I have planned, to Frankenstein up and/or toon my workbench area. (A small series of mini-projects, in itself!?) (7.) Once I'm sure I'm satisfied with everything: do any final painting chores, or adding laminate (?) tops onto the bare plywood workbench top, and so on. But for now ... I'll just clear off the clutter; give the room and the hallway a good cleaning ... and start settling into my new-and-improved, more likable area! |
|
|
|
Post by kooltoon on Jun 19, 2015 12:51:05 GMT -5
WOW, some of you Dudes got some nice places to work. Mine is out in the garage because we have 5 sweet little fur balls that do investigate everything.
My area is a mess sooooooooo I grab 2 saw horses, throw a broken hollow core door on them & work. In the back in the morning it's cooler, no sun & a nice view.
After lunch & a nap I move to the front of the house, again were there is no sun & a nice view. At this time of year it's 90 to over a 100 outside, sure glad for the
garage door & shade that the house makes. I'll get pics of my outside area set up later.
But for now here's were I can't work. My Mess. BTW I do have garage doors on either side of my work area, a drive through, makes it really nice in the summer.
|
|
|
|
Post by kooltoon on Jun 19, 2015 13:25:34 GMT -5
Wardster, I was looking at your work area & noticed the U-Boat pic. Love it. Did you draw it. I blow up the pic & got a good laugh of the power plant it has. I'm wanting to build one & am gathering parts. It looks like 3" PVC will be the body. It's a start.
|
|
|
|
Post by wardster on Jun 20, 2015 22:08:28 GMT -5
Wardster, I was looking at your work area & noticed the U-Boat pic. Love it. Did you draw it. I blow up the pic & got a good laugh of the power plant it has. I'm wanting to build one & am gathering parts. It looks like 3" PVC will be the body. It's a start. That design was done by Bill Campbell -- the same artist who designed most of the Weird-Ohs series, back in the day. That wild and fun, 'tooned submarine was just one of his many "very cool, but never built" models. Got as far as the design stages, and looked really cool ... but didn't get to become a full kit with the others in that 1960s series. You may want to check out that artist's book of artwork. The folks at Amazing Figure Modeler magazine sell it ... www.amazingmodeler.com/books2.html... or here's an Amazon link (with a lower price) ... www.amazon.com/Weird-Oh-World-Art-Bill-Campbell/dp/0764346482/Just be ready for a mega-overdose of awesome eye candy, if you pick up a copy of that book!!  |
|
|
|
Post by kooltoon on Jun 21, 2015 11:34:09 GMT -5
Thanks for the sub info & the book info. Crazy stuff & lovin it.
|
|
|
|
Post by wardster on Jun 21, 2015 12:25:35 GMT -5
Kooltoon, your comments (along with the forum's Spring Cleaning / reorganization) got me thinking. I started a list of books like that, over here ... car-toons.proboards.com/thread/847/recommended-reading-great-books-inspirationI started that message thread in hopes that ... (1.) "Serious modellers" can see what they've been missing, and ... (2.) Toon Newbies can have a "one stop shop" for getting themselves more deeply immersed in the tongue-in-cheek or laugh-out-loud part of the hobby ... (3.) ... and also so that guys like me (who are already totally sold on diggin' these krazy kool tooned models!) can find out about any Toon Goodness we didn't already know was out there! I got the ball rolling, with a couple of classic books ... but I'm sure I missed a bunch of good ones; so I hope that others will chime in and add to that list.  |
|
|
|
Post by wardster on Jun 21, 2015 12:36:00 GMT -5
I may have some questions for ya, Kooltoon -- in relation to the pics you posted, above. I'll think 'em over, and either post 'em here or PM you with them. (But meanwhile, if you feel like chiming in with some added comments, explaining what's seen there ... yay!!)
|
|
|
|
Post by kooltoon on Jun 23, 2015 0:34:30 GMT -5
Wardster, mainly what you see is complete ciaos.
1 pic - far left, mig welder, 6" X 2 1/2" work bench, in front of that is my lathe, the above cabinets have 1/8 scale WIP's
2 pic - lathe, cabinet in middle has lathe tools, bins below have plastic & tools, file cabinets= building supplies, plastic, metal, cardboard, clamps & other tools.
3 pic - 4' X 8' table, Dremal tools right of fan & two rolling work tables.
Any ?'s just let me know.
|
|
|
|
Post by kooltoon on Jun 23, 2015 0:44:31 GMT -5
Here are pics of my portable work area, two saw horses & a busted up hollow core door.
1 pic is the front of the house & what I look at.
2 pic is back of house were I work in the morning. After lunch & nap it's to the front. I stay out of the sun. 90 to 100+ noon till 5.
|
|
|
|
Post by kooltoon on Jun 23, 2015 0:47:26 GMT -5
|
|
|
|
Post by Starryeyes on Jun 28, 2015 14:35:25 GMT -5
I figured with my upcoming project that I better finish a project that I had already started.. All I had left was to plug things in, and bring out my hole saw to make an exit for the exhaust... All done !!  |
|
|
|
Post by wardster on Jul 14, 2015 13:30:08 GMT -5
Something that's impressing itself upon me, more and more, as I read (skim, initially!) through the dozen or more used books I've recently ordered from Amazon's used books section -- (books mostly about small woodworking shops, and/or custom-designed workbenches) -- is that a shop is essentially a tool. A workbench is a tool. It has to perform a certain desired function, at a certain pace, for a certain specific person, and do it all in a way that suits that person's needs and desires.
Which is what this message thread is all about, too. I'm really digging reading through those various books, and seeing pictures of what other hobbyist's shops look like.
As I read through those, I'm bouncing back to this thread, too ... and getting lots of ideas for the future!
Thanks guys, for posting pics of your shop areas! (And keep 'em coming, please!)
|
|

