|
|
Post by wardster on Aug 21, 2016 23:26:37 GMT -5
Here's my starting point: a 2016 Baron re-release kit. 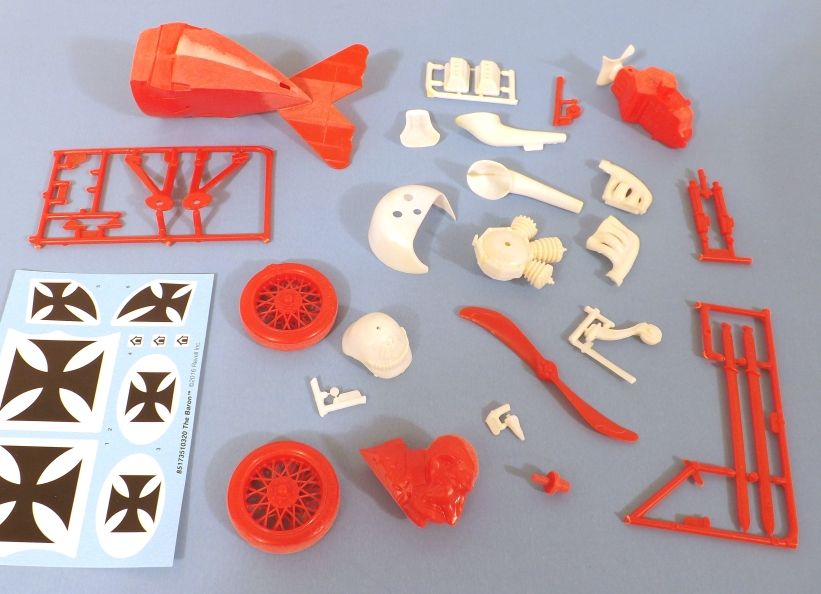 As seen here, it's barely started. The chrome bits have been de-chromed (via a dunk in some "Purple Power") and some of the larger sub-assemblies are together. Some sanding has happened, on seams, to level things out. A bit of block sanding, in other areas, too. And some putty work has begun (using "Magic Sculpt") on the bottom of the fuselage, and a few other minor places. One other thing I did, which I'll probably have to re-do a bit, when I get to the primer stages, was running around the edges of some of the parts, with a sharpened file (sort of a fat needle, almost) that I use as a scriber, just to better define where one painted surface meets another. Easier, when it gets to the paint stages, to have a sharp line to follow. Seemed worth the time. |
|
|
|
Post by wardster on Aug 21, 2016 23:54:59 GMT -5
With this kit, my plan is: I'm keeping it fun and simple! What I mean is: way back when this kit was last re-released, I bought one kit (and only one, darn me!) ... and went ballistic with it. And right when it was starting to look like I was really getting some progress made, in a number of areas, Life Events took place -- including Big Deal himself, passing away -- and that particular kit, that I was working on back in 2007, never got finished. Ugh. On the plus side: I had been emailing these pics, below, to Tres Wright ... who, back then, told me that he had shown them to Mister Deal, his own bad self ... and he apparently liked what he was seeing. (Which rocks!) And said something along the lines of, he couldn't wait to see this one when it was finished. And then, I kept making it more and more complicated. He passed. I got bummed out. And the 2007 kit, though well-started, never got completed. ("One day, but not today," I guess is the tune, as far as if/when I'll ever get back to making up the rest of the parts I wanted to make, to super-detail a "fun, simple" kit. Ahem.) Anyway -- to better enforce "simple" on my 2016 build-up, the first thing I did was to glue the two fuselage halves together! Why? So I could avoid temptation, with this particular build-up. I just want one box-stock, with maybe some simple (aka: "fun" not "work"!) modifications. But I'll go out of my way, on this build-up, to NOT do anything like this... (Note that these are pics from my 2007 build's work. They don't have anything to do with this current, different build-up, and won't be part of this challenge. It's just eye candy, in case others might want to get some inspiration from my older work!) 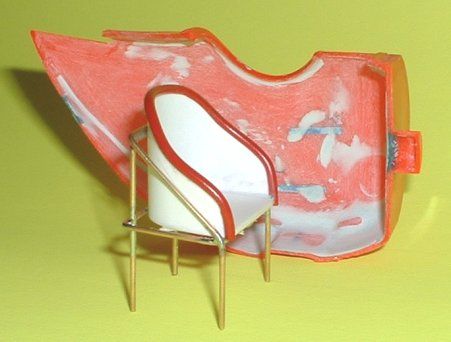 Pic above: a sheet plastic seat, based (more or less: hey, it's Cartoon-Land!) on the original (wicker?) seat type, as seen in the references photos I had, pertaining to the real WWI aircraft. Framing stuff is brass rod, bent up and then soldered together. 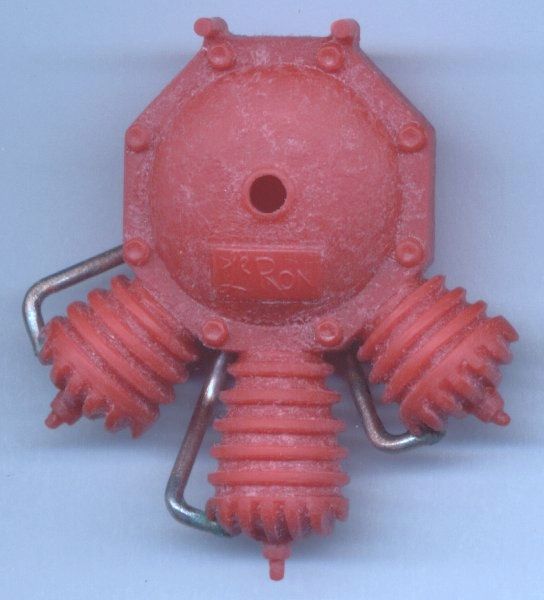 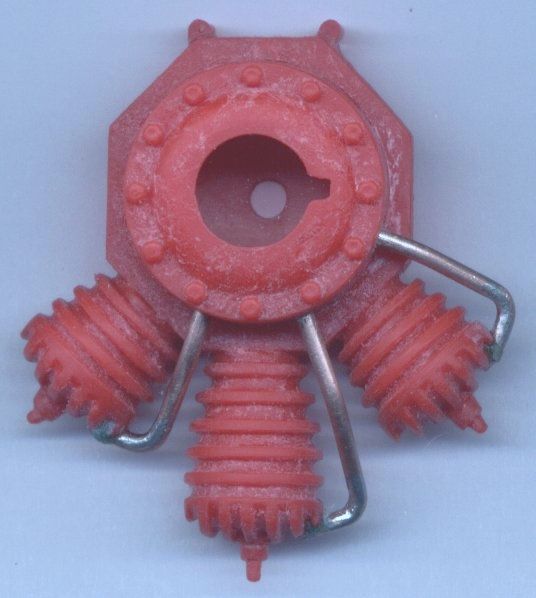 Two pics above: Bent brass tubing, to create the engine intake tubing, as seen on the real "Le Rhonne" engine types. (Germans in WWI sometimes used a copy they had made, of a good-running, original French engine -- if memory serves, anyway.) 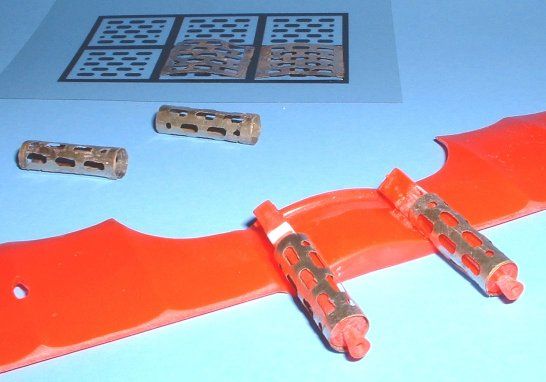 Pic above: Yes, I have even custom-etched some sheet brass! (I used to etch circuit boards, as a completely different hobby.) These etched copies did not come out so hot. If anyone wants the artwork pattern for the custom 'tooned outer heat shields, I still have that artwork -- just PM me or email me or something, and I can send the artwork for that, to someone who'll put it to good use. (But no, sorry, I don't have any spares of the shields, themselves! I haven't etched anything in a lot of years!) Pics below: The mocked-up, taped-together cockpit pieces, or at least most of it. 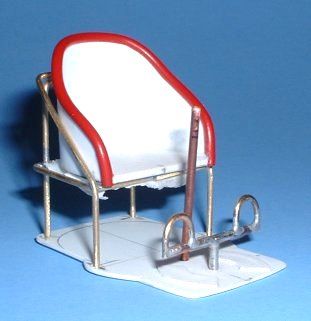 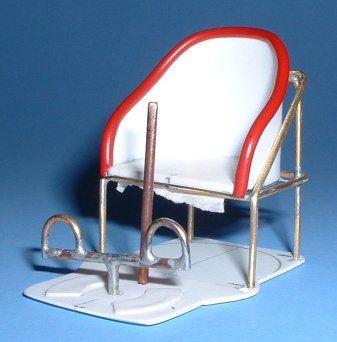 (Note: again, these aren't anything that I plan to be resurrecting, for this current build-up! I'm just showing other "unrelated" work, on the idea that maybe it will serve as over-the-top inspiration for others, in their own build-ups of this fun "new" kit!?) |
|
|
|
Post by TooOld on Aug 22, 2016 16:09:17 GMT -5
Here's my starting point: a 2016 Baron re-release kit.  As seen here, it's barely started. The chrome bits have been de-chromed (via a dunk in some "Purple Power") and some of the larger sub-assemblies are together. Some sanding has happened, on seams, to level things out. A bit of block sanding, in other areas, too. And some putty work has begun (using "Magic Sculpt") on the bottom of the fuselage, and a few other minor places. One other thing I did, which I'll probably have to re-do a bit, when I get to the primer stages, was running around the edges of some of the parts, with a sharpened file (sort of a fat needle, almost) that I use as a scriber, just to better define where one painted surface meets another. Easier, when it gets to the paint stages, to have a sharp line to follow. Seemed worth the time. Nice start , good to you join the fun !  |
|
|
|
Post by grumpygrowly on Aug 25, 2016 10:23:33 GMT -5
nice start. I might use that intake tubing idea from your other build.
|
|
|
|
Post by wardster on Aug 26, 2016 15:49:44 GMT -5
|
|
|
|
Post by wardster on Aug 26, 2016 16:13:06 GMT -5
nice start. I might use that intake tubing idea from your other build. Coolness! Glad to hear it! This is a very cool and inspirational place to hang out, and sharing what we're all doing makes it more fun and enjoyable -- even if, sometimes (like on my challenge build), the idea of "inspiration" really equates to watching someone else trying to show some uncharacteristic self-restraint, in the hopes of actually finishing a build, and/or working it onto our crowded "to do" lists. Fortunately, in case I ever "did it, again" with a second Funfdecker build, I had once made myself a little cheat-sheet, as I had carefully sized and bent each of those tubes. The idea being to remind myself, later on (like now?!) where the bends are, on the tubing itself ... and how sharp each of bends they should be ... and so on. I scanned the old index card cheat-sheet in, this morning, without resizing the image or anything. Just printing it out, should work, as far as the actual sizing. (Ditto for the other scans I made, this morning: the ones above, with the "rulers" visible, for exactness and/or paranoia purposes.) 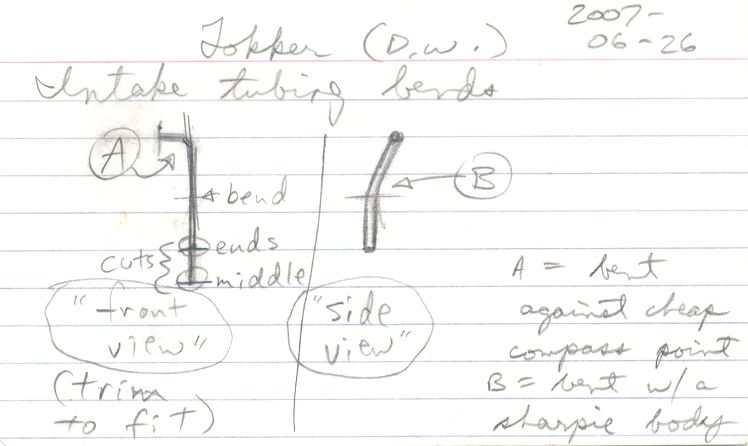 Not noted on the card, but important: I made the bends, first ... and the cuts, only afterwards. Works easier that way. On another subject: I probably sounded kinda harsh, in my second post in this thread, but I didn't mean to sound that way. I just didn't want to disappoint anyone, that I wouldn't be continuing that 2007 build-up (or adding those details into a 2016 kit, I guess I should say). But I'm all for sharing what I had done, if anyone else wants to use the info in some way. |
|
|
|
Post by grumpygrowly on Aug 26, 2016 17:35:18 GMT -5
wow lots of great info! I use others WIP threads to learn.
My father and brother did models together when we were younger but I was not part of that.
My mother is an artist and art teacher, never got to take a class from her. State of CA says thats a conflict of interest.
My Brother worked for Games of Berkley making window displays, I was not stateside.
So you can see I missed out on some good stuff. My fault. oh well.
Two years ago I needed a way to keep my hands busy while i quit smoking. I found an AMT 53 corvette kit, nothing fit, hand painted it (like I had seen my dad do) what a lump of glue! lol
Now I use the info y'all provide limited or vast, I use all I can get.
Thanks
Jonathan
|
|
|
|
Post by bubbajoe on Aug 27, 2016 12:36:37 GMT -5
WOW!!!! holy custom fab batman.... that looks great!!!
|
|
|
|
Post by wardster on Aug 28, 2016 14:40:06 GMT -5
Oops! I forgot to mention that the dashboard I was fabricating, for my 2007 build-up, was actually based on "references" -- mainly, artwork by Dave Deal, himself. Here's a link to that specific web page, showing that artwork ... treswright.vervehosting.com/Pages/deal-art6.htmlAnd here's a menu page, with more artsy stuff to look over ... treswright.vervehosting.com/Pages/dave2.htmlAnd (in fairness!) here's the main page of that site, so people who aren't already familiar with it, can check it out! treswright.vervehosting.com/NOTE: If you check out that artwork, you'll see a little placard with some lettering, on the Funfdecker Fokker's dashboard, in the dash's lower right hand corner. I had emailed Tres Wright about that, back in the day (June 2007) and he had emailed me back with this ... ----- (quotes on) I Googled VNE and it designates a "never exceed" airspeed. It is the maximum airspeed the airframe should be subjected to in a dive. Beyond that speed the airframe could sustain structural damage. VNE isn't an abbreviation, it's actually a formula. So now the question is what the 10ER means. I'm sure it's some kind of joke, Deal loved to slip little obscure jokes into his artwork back then. (quotes off) ----- Tres, who was in pretty regular contact with Mister Deal at that time, had passed that question on to Big Deal, to see what he'd meant by that apparent in-joke's inclusion. In response to that question, Dave "Big Deal" Deal had written back to Tres Wright, saying this: ----- (quotes on) Tres, Please tell him that what I meant was 100 DM/hr ( D= Deutsche ) Meaning 100 German Meile /Per Hour. which works out to roughly 400 nautical miles per hour or 440 miles per hour. This is cartoonland here isn't it. So, as best I remember, VNE ( yes you are correct = velocity, never exceed ) 100D....(obscured by edge of cockpit )...M/hr Hope this helps. DaveDeal (quotes off) ----- And then, in passing that emailed message from Mr. Deal, to me, Tres Wright had added this: ----- (quotes on) I knew it would be some kind of tongue-in-cheek joke, imagine one of those old Fokkers going 440 mph!!! LOL! (quotes off) ----- So, there ya go! More cool in-joke trivia, regarding more cool artwork by Mister Deal! |
|
|
|
Post by brizio on Sept 1, 2016 9:31:33 GMT -5
Love the details you are adding!
|
|

