|
|
Post by wardster on Mar 30, 2019 23:59:31 GMT -5
Thanks to this contest spurring me to look around, and see what else was out there, that I was only dimly aware of, I discovered the "Weird-Ohs Collector Cards" series ... and card #64, in particular, said "Oh, dude, you gotta build me".   I tried to ignore that feeling, or push it back, so I could concentrate on the two builds I already said I'd work on, for the Reunion Contest. "Stay disciplined," I tried to tell myself. But the feeling (that this image was too cool to ignore) didn't go away. So, after a few days, I decided to say "what the heck" and go with that feeling. (Thus pushing one of my two contest builds back, deadline-wise ... at least in my mind. My plan is that I'll keep going with Huey's Hut Rod, as planned ... and will work on the "Peppy's Blimp Repair" scratch-build, a little at a time, as the moods hit me. But if I only get Huey done, for the contest, that's fine. I'm figuring that whatever I'm doing that feels like fun, is what the contest's core is all about, anyway ... and some of the other guys here are diggin' the tips and unusual materials I'm using, so I'm counting "maybe I can inspire some folks" as a major plus and motivating, in itself.) So ... here's the work I've done, so far, on this "Kooky Klancy" figure sculpt (or scratch-built mini-diorama): First major steps (see images below) was for me to plan out the sculpture's final size (I chose something roughly in scale with the head of "Francis the Foul") and to get a better idea of what the body part's proportions were, in relation to one another. For that part of things, I sort of "stole" the measurements from the "Frantic Banana" kit.  I'm skipping a few of the preliminary steps, but the explanation above probably covers the raw idea of it. So the next step was for me to make some kind of an armature; which is just a stiff inner skeleton, in a way. For the way I do things, at this stage of my own learning process with sculpting, etc., the drawing above and the armature "sets" the length of various "bones" inside the figure; and tells me where joints / bends are.   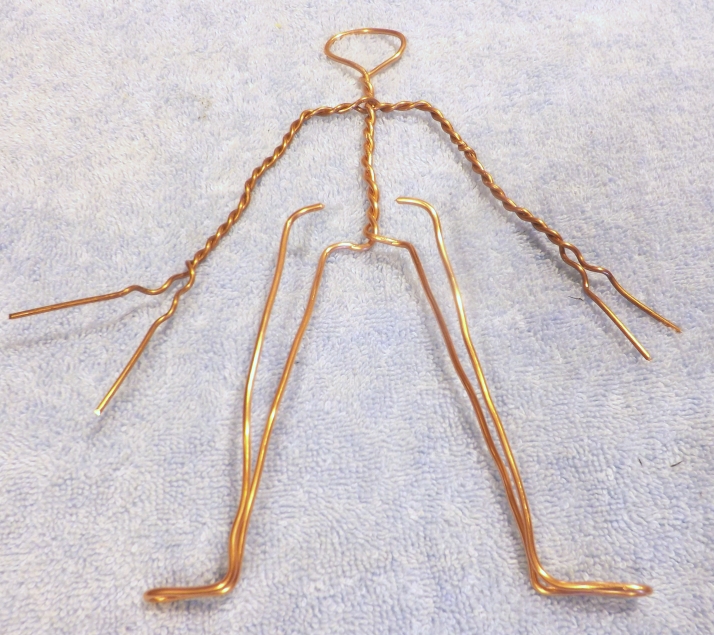   Hopefully, those pics cover the explanation of what I'm doing, and why? (If not, ask. But know there's no single standard for this kind of thing. Different people use different materials and methods, and different procedures. This is just what works for me.) The one thing that may not be obvious, I'm about to show in a bit more detail: 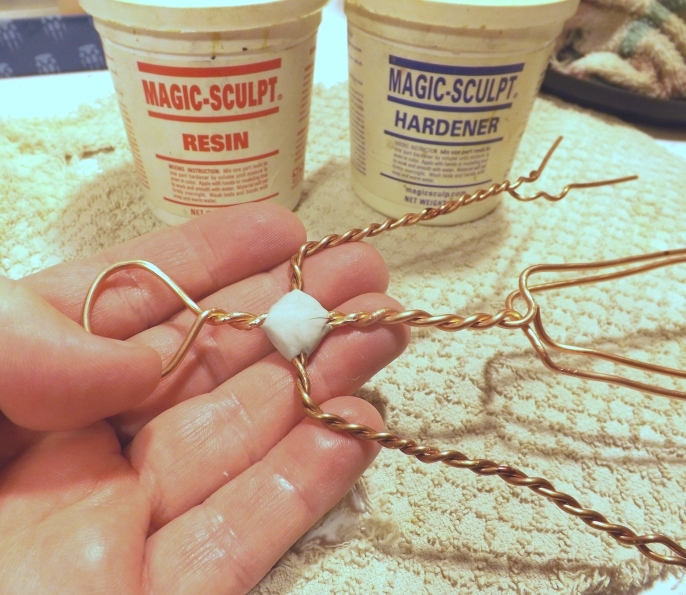 What's going on in the pic, above, is that I like to have "redundant back-ups" as far as my spine; individual arms; individual legs; and so forth. That is, two "layers" of wire. That's probably fairly obvious, in my pics, above. One subtle thing is that I didn't want to get overly "fat" on the arms, so I used a thinner wire guage on those parts; and to make sure I "locked the arms" into the overall armature, I did two things. The first method is to run the first arm wire THROUGH the spine's two wires; and the second wire goes OUTSIDE of the spine. That makes it pretty resistant to moving around, when it's not supposed to -- vertically, anyway. To lock it in the rest of the way, after the two wires are twisted together, I apply some mixed two-part epoxy-style "Magic Sculpt" to that entire joint area; but not covering the actual "shoulders" more than I have to. It gives me a bit of adjustment, if I need it, to do it that way; but mostly keeps things from moving all over the place, later on, when I'm trying to set "contrapposto," and so on. I explained that term / idea in another thread on these boards; here's a link to that stuff: car-toons.proboards.com/thread/1559/andy-pearsons-sculpt-drewSo, anyway ... The two parts of each separate leg I was basically too lazy (and/or "carpal tunnel challenged") to twist together; so I found some small gauge wire, and I just wrapped each of the "two bones" together. (I needed smaller wire, anyway, for fingers, when I get to that part of things. Note that I'm not including hands of any kind, as yet.) Note that I did NOT cover up the knee areas, with either this fine wire, or what's coming after it. I'm trying to leave those areas flexible, etc., and with enough room for me to get two pairs of needle-nose pliers "in there," so I can probably bend those "knees". As I think I explained at the link, above, I sometimes "color" or "darken" my sculpting materials, at specific points on the sculpture; so I don't "lose track of major bends".  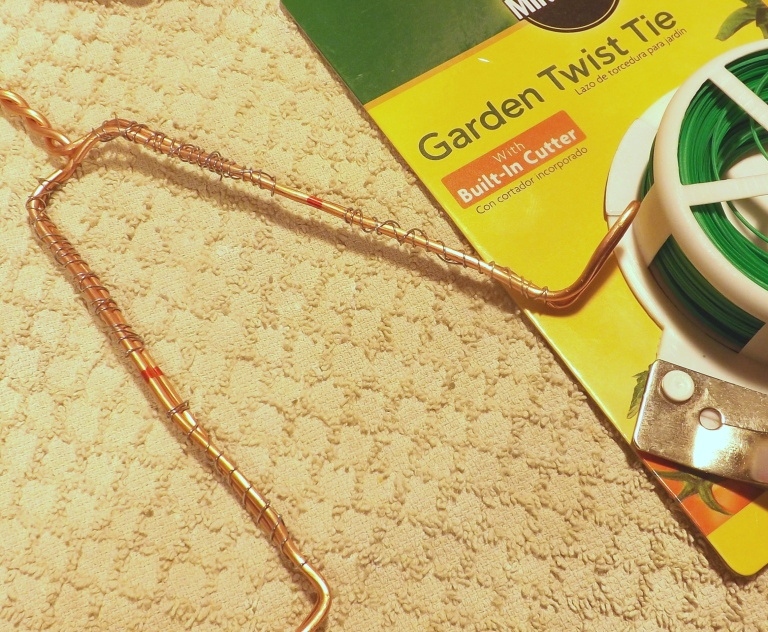 I also (below) added a bit of the second batch of the mixed "Magic Sculpt" to the ring that is standing in, for now, as a "head" for the figure. (Or a "head mounting point". I haven't yet decided on all of the how-to details of that portion of things, so I've not fattened the whole head up, to it's final size. It's just something to add to, later on.) 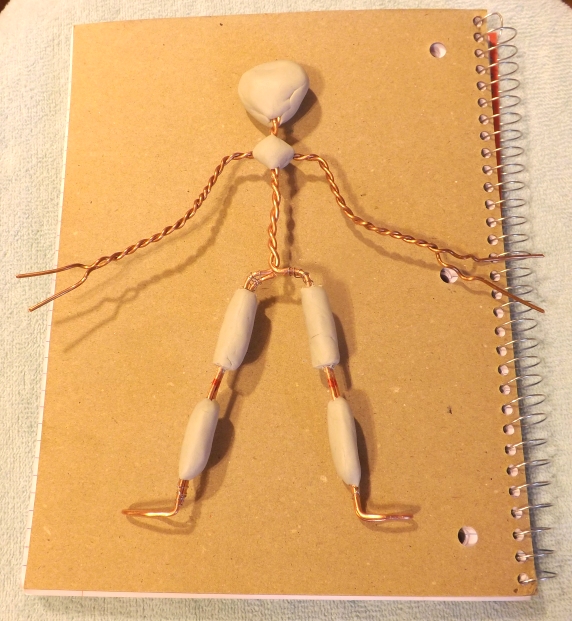 Last pic, for this project, for now ... 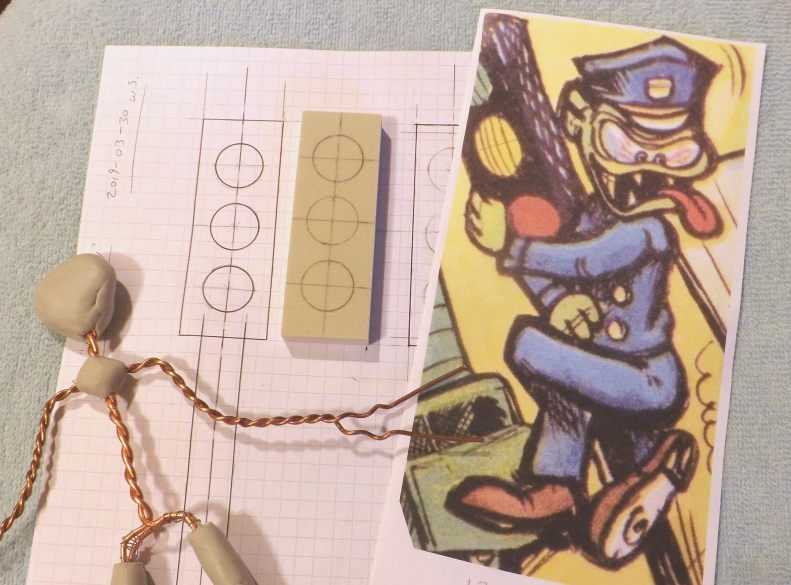 What's going on there is that I won't be able to properly "wrap" the figure's limbs and body around the traffic light, until I actually HAVE one, to wrap anything around. So I drew up a couple of slightly-differently-sized lights ... got one I mostly liked ... and got out a scrap piece of Renshape (fancy and expensive pattern-maker's materials) so I would have a 3D "thing" to stare at, for a while; to see if I really like it, at that size. (EDIT -- regarding "Renshape" ... that greenish grey "traffic light face," seen in the picture, immediately above, was a small piece from this sample kit, over at Freeman's Supply ... www.freemansupply.com/products/sample-kits/machinable-media-sample-kit... I just thought I'd throw in a link to where I got that material, if anyone else is interested in getting ahold of small amounts of pattern maker's supplies, that would normally, in standard industrial-sized pieces, be WAY out of my wallet's capabilities.) I probably won't do another picture update on this project, for awhile; I've been wanting to get back to some painting on my Huey's Hut Rod project, but it's been very humid the last few days. And I'm not 100% certain where I'm going with things, on my Peppy's Blimp Repair build. But those are good problems. I've been looking for an excuse to get back to the bench, as it were, for WAY too long ... so, even though it feels "undisciplined" in a way, to be doing some preliminary work on a third project (not to mention mentally thinking ahead to the Halloween Trick-or-Toons contest?!) while two others are going on, I'm going with my moods, and "just doing whatever feels like fun" instead of worrying about things. If I get Huey done for the contest, and finish this and Peppy's vehicle, only after that contest is over with, that's cool. At least these boards / this contest "got me moving"!! (Feels good!!) |
|
|
|
Post by sharp on Apr 1, 2019 18:54:13 GMT -5
Great work done so far.
|
|
|
|
Post by Starryeyes on Apr 2, 2019 16:39:55 GMT -5
Oh man !! I’ve got my popcorn and soda setting in the front row !!
|
|
|
|
Post by modelcarfan on Apr 2, 2019 17:11:24 GMT -5
care to share, chuck? Im watching em too  |
|
|
|
Post by scooke123 on Apr 2, 2019 18:53:13 GMT -5
Watching this one too!! Looks pretty cool!
Steve
|
|
|
|
Post by wardster on Apr 3, 2019 1:28:45 GMT -5
Thanks, guys! Much appreciated!  |
|
|
|
Post by wardster on Apr 3, 2019 11:17:08 GMT -5
Two new pictures, for today:  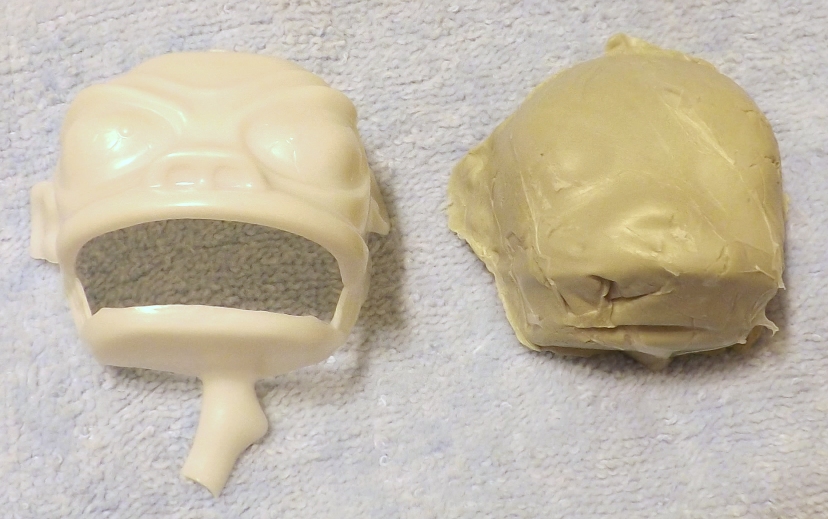 What's going on there is that I wanted to make a "mostly hollow" head for my figure. I wanted whatever I made to have the shape of a specific, existing Weird-Ohs kit part; and the rough size of it, too; since I wanted it to look more or less like a kit that "belonged" with the original series. Sort of an unreleased Weird-Ohs kit, as it were. To make a start on the front of the head (the face portion of the head) I decided to use a piece from the "Francis the Foul" kit. (That head part being from a reissue of the original 1960s Weird-Ohs kits; but one of the sports kits, that not too many people really build.) I am going to use the INSIDE of that piece, rather than the outside of it; and use it as a mold, not the final "all detailed out" shape of the head I want. It's a starting point, that should save me a lot of time and effort, trying to match rough shape and size; while also allowing me to detail my head's surface in a different way: changing the eye shape some; probably mostly eliminating the kit's nose; and so on, so that the final head is a better match to the "reference artwork" (collector's card) than the kit's piece. What's going on sort of "behind the scenes" in those pictures is that I first got some "Parafilm-M" (I'll check the spelling later, but I think that's correct) and stretched each piece a bit (what I have isn't really wide enough for this task) and, just to be a bit paranoid, I laid two layers (instead of only one) of that stretchy, thin material into the head. This acted, more or less, like a "barrier" or almost a "mold release," between the kit's styrene plastic part, and the "casting" I'm making from it. After that I just mixed up a big blog of Magic Sculpt, and pressed pieces of it into the "mold cavity". I let that set up and harden, overnight. And in the morning, before my day really got started much, I just gently popped the "casting" out of the "mold" and took the pics, above. Later on, I'll clean up any left-over Parafilm, off of the "casting's" surface, and detail the face out, using more of the Magic Sculpt material. As you'll notice, I was pretty generous with my new casting's "wall thickness," when I was making the part. Doing things that way lets me grind off material I don't want (which would be VERY hard to do, with the original kit's part) without too much worry that I'll "break through the part" on accident. And if I ever do get carried away, and grind off or otherwise remove too much of the "face" of this figure, adding more Magic Sculpt to the backside of the "casting" is easy; since I'm not trying to work with a solid head. In other words, I'm leaving the back of the head off, for now, on purpose; so I can concentrate on the face. Hopefully, that weirdness makes at least a little bit of sense? One other thought, for others that might be sort of wondering how to mis-use these tricks or tips (worse than I'm already mis-using them?!) on their own current or future builds, is that if you're starting with a solid head (or other piece) and you want to do more or less what I'm doing here, to come up with a "hollow" piece you can modify, to make your final piece, one thing that works is to make an RTV rubber mold of the piece you want; and then, press your mixed Magic Sculpt material into the rubber mold. I've done that, too, as an experiment. It works fine. Might take a bit of practice to get the hang of it, but it does work. (A tiny bit of ordinary water moisture on your fingers, as you're handling the Magic Sculpt, helps to get a smooth first (thin-ish) layer pressed in there; after which you can just layer it in, until it's enough. I did that, as an experiment, with some Deal's Wheels heads, and really liked the "casting's" end results -- see link immediately below for more about that experiment.) car-toons.proboards.com/post/11102/threadLike StarryEyes had said once, in some other (more recent) thread: I tend to be the "Mad Scientist" type of builder! It causes me not to finish too many things, sometimes ... but I end up with some pretty cool tricks I can sometimes share with others! Anyway, I like trying little-known or seldom-used-by-others materials that I've read about, in magazines and so forth, and "seeing what the weird new-to-me materials can do". My use of Parafilm, for instance, as sort of a "mold release agent" isn't precisely what I had read about, years ago (1990s?) in things like old back issues of Modeler's Resource. Those writer-builders were using Parafilm as a masking agent, for paint jobs. I got some of it, and tried it. Was glad to have another trick I could use ... but I guess my having "grown up poor" made me always be thinking, "Okay, what other uses can I find for this stuff??" I had some of that Parafilm material left, a few years ago, when I needed a "non-chemical, not-too-messy" way to make a barrier between two slightly-mismatching kit's parts (my fault, actually: I was slightly re-posing a figure from the first Dirty Donny kit, and the feet no longer fit where they were supposed to, on the kit's base) ... and I gave Parafilm a try. And it worked fine! I know I use a lot more words than most folks here, and I apologize for that, but I "just like writing" and when I'm "stealing a trick from someone else, and modifying it" it only feels right to me, to try to give credit where it's due, for someone else having taught me something cool; and (me being the nerd that I am) it feels important to try to explain the genesis of how I got from "Point A to Point B," as far as modifying someone else's tricks. Which, I hope, show's that it's not magic, it's just out-of-the-box but step-by-step thinking; and let's others modify what I'm doing, later on, in ways that I wouldn't have necessarily thought of. |
|
|
|
Post by wardster on Apr 3, 2019 11:44:37 GMT -5
Okay ... here's another way I can try to explain more about what Parafilm is, and what I did with the kit's head from "Francis the Foul". Here's three pics, from a completely unrelated (but still "toon") project ...  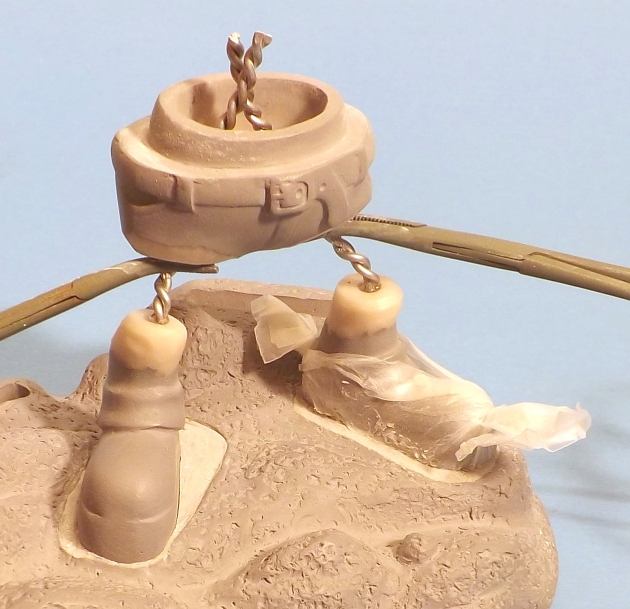 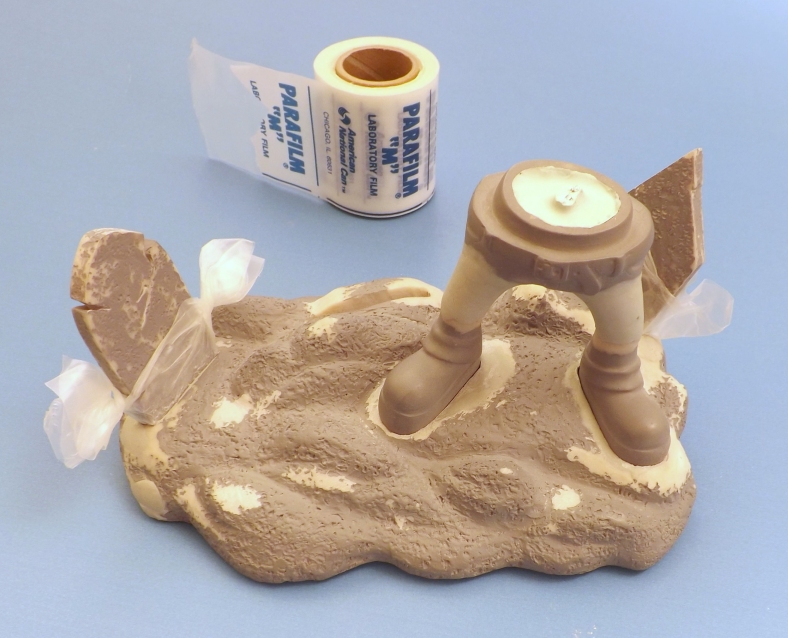 ... which attempt to show, in a more visual way, what I was talking about (mostly with words) above. I'm mainly showing these pics (which feel "off-topic" for this particular build, but are "on-topic" in terms of what I am trying to explain, techniques-wise) because I think these images might "show the idea, better". I'm thinking about using the Dirty Donny "Two Much" kit as one possible entry for the "Trick or Toons" Halloween contest, so I won't say too-TOO much more about that build, in this thread. But I think these pics demonstrate the "trick" well; or at least I hope they do? Leaving me mainly to say that what I was doing was "moving things around, a little bit" with that kit: changing the leg's angles and the feet's position, etc. And I got a wild hair and decided to alter the kit's tombstone's positions a bit (I think to better match the box art, if memory serves? It's been a long while since I did what's seen in these three pictures.) Anyway, another reason for showing "sort of off-topic" pictures is that it shows another instance in which I used sculpting wire (the actual, more-official, way-more-expensive stuff: made of easily-bent aluminum, in this case), in sort of a "twisted pair" fashion, to work as a "skeleton" or a bit of inner structure, that I could lay some Magic Sculpt over. In case you're wondering, what the two hemostats or long skinny medical-style clamp thingies are doing, is holding up the "pants bottom" piece, exactly where I want it. If memory serves, I then blopped some mixed Evercoat-brand auto body "icing" into the "empty pants part" to lock the leg's wires in place, to that kit-supplied part. Then, I used Magic Sculpt over the twisted wire "leg bones," to create "new upper legs". I did that, one leg at a time, so that I could use damp fingers to smooth the epoxy putty out (without accidentally bumping a "still not hardened" leg, nearby) ... thus saving me a LOT of sanding and related work, later on. The ability to just keep a damp cloth handy, to moisten one's fingers with, makes me LOVE using Magic Sculpt! I'll get back to this project's ("Kooky Klancy's") actual work flow, in a bit. Pardon that slightly-off-topic interruption, as it were ... but I think it might go a long way towards explaining what the heck I think I'm doing, with weird materials and techniques. |
|
|
|
Post by wardster on Apr 6, 2019 14:09:50 GMT -5
One more "slightly off-topic (but not really)" picture, that's meant to demonstrate a technique:  What's going on in that image is that, some time back, as an experiment, I wanted to see a "worst case" sort of situation, if I was trying to use "Plaster and Vermiculite" instead of some other material, to make a solid "male" casting, using the insides of a kit's figure body parts, as a "female" mold piece. Because I wanted to test the limits of the materials I was using, I used no mold release of any kind, to make these parts. I just glopped some mixed "P&V" into the kit's parts, and set them aside to dry. Another no-no I tried to do, just to see what would happen, was that I gave it insufficient time to really dry properly, before I pulled the pieces out of the "mold". Because it was still mostly wet, where it was touching the kit part's inner surfaces, it sometimes "tore" or "ripped" or "didn't come out of the mold, all that cleanly". The head suffered worse than the body, due to the complexity of the "two molds" (by which I mean, I was sort of looking at "head halves" as one "mold," and "body halves" as "another mold". |
|
|
|
Post by wardster on Apr 6, 2019 19:25:30 GMT -5
Some "on-topic" (finally) pictures ... which I'll explain later ... (my dog is telling me "let's go play!") 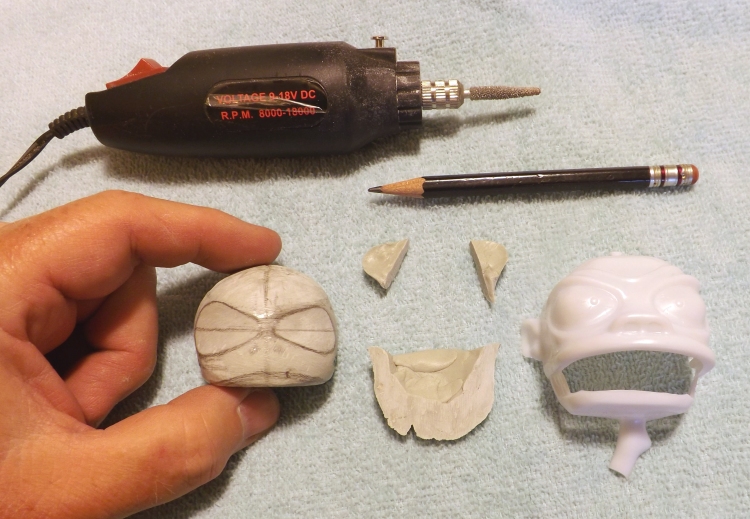 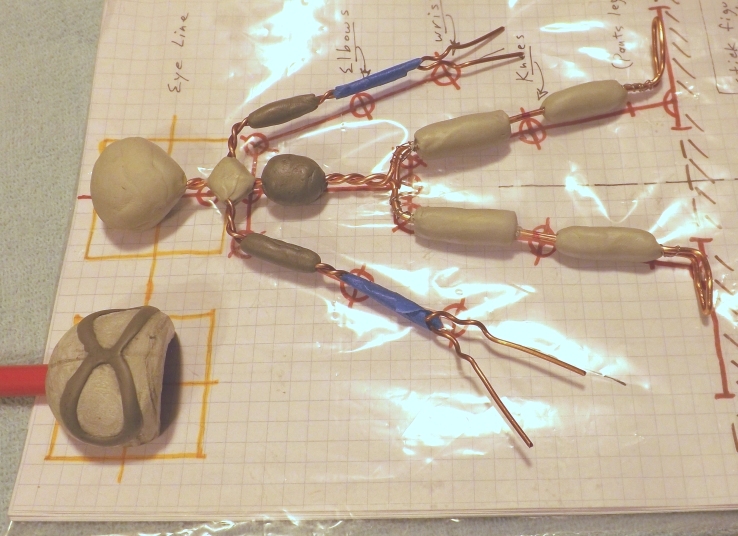 |
|
|
|
Post by wardster on Apr 6, 2019 23:03:51 GMT -5
Okay, it's later. What those two last photos are showing is recent work on the nice, thick, epoxy putty (Magic Sculpt) carve-and-sandable upper portion of the figure's head. I made it so thick (a few steps ago) because I knew I'd be really abusing it, when I got to this stage. After cutting off the ears and lower jaw piece, I took it out to the garage, and used a one-inch wide Dremel brand belt sander to re-shape it. The intent there was to knock off anything that was sticking up, that I didn't like or didn't plan to use, in the a-bit-later stages of this process. Which was a lot of things: starting with the "corners" of the face. The kit's mold-makers needed the shape to have no undercuts, so it was easier for them to sort of have a squared off head (as seen from above or below) ... sort of like a box, but with rounded-off corners. I wanted the head to actually be "round". Hence, again, the rather extreme "wall thickness" I used, when I filled the inside of the "Francis the Foul" kit part with Magic Sculpt. (Probably to about 1/4 inch of thickness, give or take; around 6 or 7 millimeters, if my brain's rough metric conversion is up to par.)
One reason the jaw and ears got cut off (besides sculpting new ones, later on) was so that I could have a way more "flat" rear portion of this head's shape; and a "flat" lower part of what I'm working on. It's a partial face, more than a head, at this point ... and it's still hollow ... but it's part of my way of doing things that being able to work in "hull halves" or "fuselage halves" (or in this case, head halves) makes it a lot easier to place a work-in-progress down onto flat surface, while I'm working on it. It may just be habit, to a degree: there's really no HUGE reason I needed the lower jaw so "ninety degrees to the vertical later-on seam line" for the head ... but, a lot of times, I'm placing a part over a drawing, to check it for size and shape. Besides, later on I want to make sort of a "roof of the inside of his mouth" shape, so when I had glopped the putty in, before, that area I added a LOT more than I figured I might actually need. Figuring I'd be knocking a lot of it off, both inside and out, as I shaped things.
At a later time, the intent is to be able to place this hollow cut-open "ball" shape over that blob that's shown in the second picture, which is attached to the wire neck. But for now I want the two parts separate. A lot of pre-planning of what step will come before another, has to take place, and that's the rough plan so far. So even though I'm holding the part in one hand, most of the time when I'm working on it, and holding some kind of a tool in my other hand, it's still nice to have "flat edges" (for now) that I can use to lay the part down on a table; or can sort of use in a "waterline marking fashion" when I reshape the upper lip area. (Which is way more curving and "s-shaped" in the collector's card drawings, than on the kit part for "Francis". For an example of what I mean by a "waterline" look at the first of those two pictures. The horizontal line across the (approximate) center of those two hollowed-a-bit "eye socket" areas is one example: I just drew a line parallel (for now) to the lower lip. If I had shaped the lower lip like I needed it, later, I couldn't as easily mark off lines, parallel to it ... if that makes any sense?
It's not very evident, at all, in these pictures, but the eyes areas are concave in shape, now. That's why I had that grinding bit in the first of those two pictures: to show how I ground the "protruding eyeballs" down, not only until they were flat, but until they were slightly "sunken into" the half-face, half-skull. I want eyeballs that are, as much as the outline will allow, "be round" ... and what was on the kit's head was going to interfere with that. So, bye-bye the kit's eyes went. It's not quite a "skeletal" sort of arrangement, where it's deep enough to look like a cartoon monster's skull, with eye sockets ... but it's "ground in" enough that it won't interfere with whatever actual "eyeball shape" I decide to add, later on.
I was originally thinking I would add the actual eyeballs, then, the stuff surrounding it ... but in trying to imagine how well that would work out, I eventually altered that sequence. (We'll see if that was wise; but one way or the other, I felt the need to "define" where the edges of those later-on eyeballs would go.)
The armature is sitting on the "blueprint," again, so that I could sort of temporarily mark off where the elbow joints would be (using blue masking tape) so that I could use some of the rest of the mixed, darker Magic Sculpt, to bulk each of the upper arms up, a bit. And stiffen the "bony, non-bendable" part of the upper arms. What was left over from what I had mixed, went onto the torso, in roughly the rib cage area.
As far as that dark stuff around the eye areas ... that's still the same epoxy putty. I just mixed up a small amount of another brand (Milliput) of a two-part epoxy putty (their black version) and then added it to a mixed amount of the regular Magic Sculpt ... giving me a darker color, for visual contrast with some of the later steps. Pencil works fine, to a point ... but a considerably-darker-than-the-rest hardened putty makes it really hard to "lose" where your "stopping points" are, when you apply more layers, later.
Hopefully, that attempt at an explanation (of my usually-unusual methods) makes at least some sense ...
|
|
|
|
Post by wardster on Apr 23, 2019 14:47:30 GMT -5
Oops! Looks like I'm lolly-gagging and generally goofing off, instead of working on this project. So in thinking through what's the biggest hold-up, right now: it's not having a traffic light. That's next -- at least far enough to get that "mocked-up" ... at which point I can get back to some of the other stuff. I decided, after (way too much) thought, that the best (that is, fastest / simplest) way to get going on the traffic light would be to add a section of square-cross-section wood onto a wooden dowel; with both of those pieces being the same thickness. So that's what this first picture is all about. (The two extra lengths of thicker dowel, if you're wondering, will be sort of temporary "splints" or "alignment aids".)  While the wood-glue-and-sawdust mixture dries, on the wooden beginnings of the traffic light, poor Klancy sits and contemplates his future ...  |
|
|
|
Post by Starryeyes on Apr 23, 2019 18:56:36 GMT -5
Love the story telling !!!LOL !!! Klancy is looking good !!
|
|
|
|
Post by wardster on Apr 25, 2019 1:38:47 GMT -5
Love the story telling !!!LOL !!! Klancy is looking good !! Heehee. Thanks, man! Appreciated! I sometimes suddenly realize how "dry" and kind of boring I get, text-wise, and think to myself, "Oops! I gotta add some more excitement or fun, here, somehow, or this will put everyone to sleep" ... hence posing that armature that way. I'll probably be doing that kind of silliness once in a while, now that it finally occurred to me that I could have done that, a while ago. For instance, it occurs to me that nothing really keeps me from having him being a "camera hog" in photos for other projects I'm working on, or am supposedly working on. Anyway, being able to be goofy like that is one of the main benefits of doing sculpts that have a solid-enough-but-still-bendable-enough armature, that later on gets "covered up" with (in this case) epoxy putties. In an off-camera kind of way, I also extended my own capabilities and materials, a bit, for future figure-related projects. I'm able to get ahold of aluminum wire, now, from one of my local hardware stores. The "light bulb over my head" moment happened a few days or a week ago, when I figured out that while trying to cut through the nearly invulnerable, made-to-take-outdoor-weather-and-decades-of-abrasions, darn-near-tank-armor-plating insulation or outer coating on things like a #2 or #4 or even a #6 wire gauge (AWG) "single conductor" bundle of heavy duty electrician's wire, with something like a box cutter or craft knife, etc., was begging for a trip to the emergency room, or a listing on the Darwin Awards, that I could use a belt-sander to sand off a lot of that insulation, before I tried to cut through what's left of the abraded-off "tank armor plating" on those wires. As a result, I ended up being coated in oodles of rubbery-plasticy sanding residue, on that day, but I also ended up with oodles of aluminum wiring, for pennies. Compared to "official" aluminum sculpting wire, it's ludicrously cheap -- which I love! -- so for a future sculpture armature, I wouldn't be "afraid" (after this) to go with the aluminum wire, over the copper stuff. But I'm not sorry I used copper on this guy. It's one of those "use what you can get" kind of things. Heck, if pipe cleaners are all that a person can get ahold of, and you're anxious to get started doing something like I'm showing here, then try it. It might work. |
|
|
|
Post by wardster on Apr 25, 2019 1:56:55 GMT -5
I took a quick look at Amazon, and typed "aluminum sculpting wire" into their search engine's box. They can get a person stuff like sculpting wire, reasonably cheap. See these two items, just as quick examples: www.amazon.com/dp/B076R9C2FX/www.amazon.com/Tatuo-Silver-Aluminum-Bendable-Round-Nosed/dp/B07G93JQCX/But me being me, I had to experiment, and see if the thirty-something-cents-per-foot locally sourced wire could be an alternative, locally, for me. (And keep in mind, that's a per foot price, but with the wiring in the sizes I mentioned, above, it's more than one strand of wire inside. So if there are six individual wire strands (or more) per the "single conductor," then it's (say) three foot in length, but times that many individual wires. So that not-quite-forty-cents per foot price drops down, and gets subdivided up into six parts. I think the #4 stuff (which looks like a good "medium" size, to me) was 35 cents per foot; so divide that by six, or something, and maybe you can see why I was eager to see if I could use that wiring. So, anyway, if I wasn't hopelessly nerdy, and I didn't mind looking like I'd been through a minor sandstorm with "black sand" from the wire-insulation abrading work to "crack the outer shell open," then something like these two links, above, look like they'd do fine for armature work on medium-sized figure sculptures. |
|


