HOLY SWISS CHEESE batman....you don't fool around do you wardster!!!! can't wait to see what you do with that big hole
Heehee! Thanks, man! Much appreciated!
Thinking ahead, to exactly what I'll do with that formerly boring surface that I'd be staring at, all the time, when I sat down at that work bench:
Option-wise, I could always say "I'll just pretend I'm still celebrating Towel Day" -- (thus proving I'm a fan of the writing of Douglas Adams, if nothing else) -- and toss a big beach towel over it ... but since Fletch beat me to it, I guess that's out; on the "already been done; no bonus points given for stealing ideas" basis.
So ... I should probably say that, in terms of decoration, I'm thinking along the lines of a cross between bits and pieces of a "gunnery (or science?) station on a Zondarg Death Ship" ... or I could always go and study pics of various fanciful 1930s electrical gizmos inspired by props from Frankenstein's lab ... and/or there were some nifty "spaceship interior" bits, as seen in one of the first Wallace & Gromit short films ("A Grand Day Out") ... which, when stirred with a bit of seasoning from the original Star Trek Enterprise's bridge, might be the direction I'll end up going, in terms of making a functional work area also be "entertaining," later on.
But first, I gotta figure out where I want electrical stuff to end up -- (since wiring work is part of the plan) -- and before I get TOO ballistic, in planning what I'll do on the INSIDE of that room (the view I'll be seeing often), I will have to figure out how I can make the OUTSIDE of the room be consistent with a "boring hallway, in a perfectly normal house". That latter part of things, I'm not worried about. I figure I already know what I'll do, with the hallway side of the room. (I had to promise that the side of that wall that visitors would see, wouldn't freak anyone out. But the other side of that wall, I get to do up any way I want to.)
Truth is, I'm still figuring a lot of this out. Not the major stuff ... just the detail stuff.
Why aren't I further along, on the planning stages? Two reasons. One is: as of this past Wednesday, I had no idea I was gonna do this!
The idea occurred late on Thursday (no, not after a night of drinking) and the first "make a small hole in one side of the wall, to see what's in there, exactly" testing was a Friday thing. Having seen (via removing a smallish patch of drywall, on one side of the wall, only) that it was indeed very do-able, and having slept on it for a couple of nights, and finding that I still very much wanted to do it, early on Saturday I officially asked permission to bust the hole out; and to install an "Order Up!" window ... and I was given that permission. So, before anyone changed their minds ... I (step by step) busted that big hole out, before Sat. ended.
Now, that probably sounds bonkers -- (breaking that big of a hole out of a wall, with that little apparent pre-planning done, before-hand) -- but I can explain that.
The main reason I was given permission is that I've done a pretty fair amount of (usually unpaid / favor-type) work for some local friends, here or there, over the years -- and they have learned that while they may not be able to picture exactly what I'm talking about, early on, that it ends up being something cool, that they really love, when it's all done. It helped a lot that I've made one of these "order out!" windows, before, in a rental house this home's owner also owns. (Not to mention many other cool-looking upgrades I did over there, over a three year period.) In that other house, I had (after much planning, etc.) made a big hole in a wall -- much like this one -- which separated a kitchen (that I felt was a bit too enclosed-feeling) and an extra-large enclosed porch area. With that project, I had a very heavy duty, welded-metal, industrial style window frame that just needed to be installed in the hole I would make. So, the home's owner (which ain't me) could picture what I had in mind, very easily, when I compared this planned "Order up" or "Order out window" to the one she's already seen me install, in that other house. (Otherwise, if I was trying to explain my plans, and I'd never done it before, there's likely no way in heck I'd have been allowed to pull this stunt!)
Once I had promised to make the hall side of things be really nice-looking (from an agreed-upon "normal person's" perspective; and with our usual non-budget in mind, etc.), then I was more or less given carte blanche with the "my room" or "workbench area" side of that wall. Visitors wouldn't see the "goofy" side of the wall, until after they'd seen the "normal" side ... if they saw it, at all ... so, that's how I managed to get permission to do this. And why I think I can pull it off.
I'll see if I can't figure out where I put most of the in-progress pics, from that other wide-but-not-very-tall "Order out!" window, in that other house I worked on. That will likely give some idea of how the "outer" (hallway side) of this project is going to look. (More or less, anyway.) The "fun side," I'm still wildly dreaming up -- but 90% of that is just gonna be decorative stuff I'll be sticking onto existing surfaces ... which is why I'm not worried about being able to pull that stuff off.
Confidence gets built, a project at a time. Succeed at one, and you're likely to want to tackle another, right? So I should mention that years before that other "make a window, where there is a solid wall" project, in that other house, one of my big (at the time) projects was to make some custom-made window frames for a different friend of mine. The criteria there being that she wanted tighter-fitting, more "light-proofed" (as it were) window blinds in her bedroom, to sleep more soundly. The light leaking in, around the edges, really bothered here ... so Job One, there, was to make "side plates" (as it were) that would fight light leakage. But it had to not look stupid, too ... and she loved natural wood's look ... so, that job ended up being along the lines of pulling off existing trim around an everyday window in a house ... and figuring out how to replace it with something that looked a lot better than "boring standard window molding" ... so, we ended up taking advantage of the odd shape and/or orientation of the side plates, and turned them into knick-knack shelves ... which, while being unusual, she dearly loved. It turned it into "her room" rather than "any random person's room". She'd helped design the features, and I had implemented them. (Which got this ball rolling...)
EDIT -- adding some old photos, to visually explain my friend Nelma's custom-made window frames. (Might be a few ideas here for others to consider?)
Here's a "before" shot.
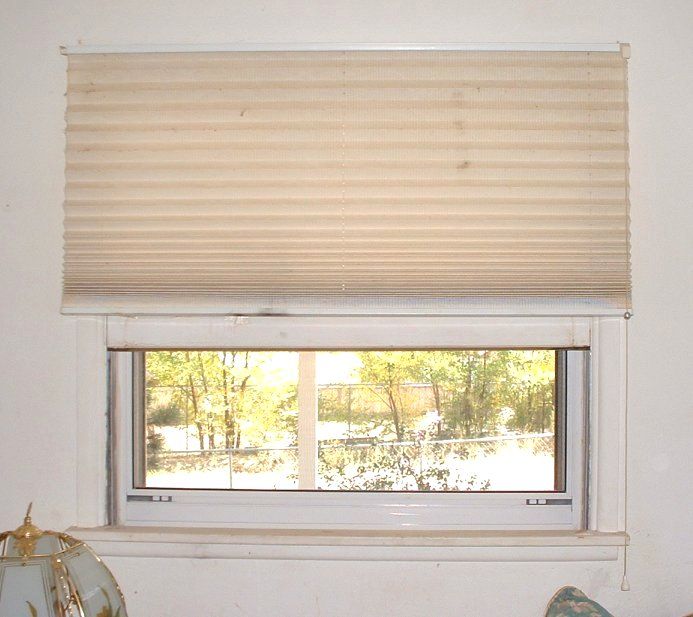
These are all old pics (from 2003) and I must not have taken "before" pics of the actual first window I worked on, for her ... so the one above is just another, similar one in the same house. The whole house later got repainted, after the walls got a good cleaning and what not ...
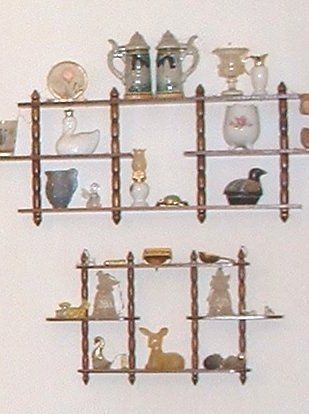
The pic below shows that she had some decorative odds-and-ends which she had up on a little shelf; which she wanted to display differently, if we could figure out a way to do it better. So, after some thought and some discussion, we came up with using two "side plates" (to keep light leakage way down); and an upper flat surface (which doubled as a full-width shelf, in a way, for larger items than the ones below); with a bunch of quarter-circle mini-shelves along the sides.
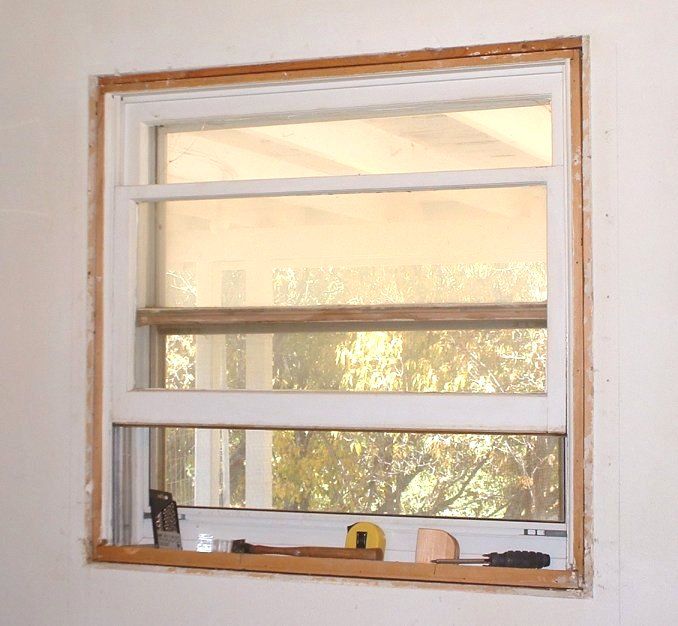
After our planning, I (gently) pried off the old / boring window edging or molding, or whatever; as seen below. Leaving a few gaps that were later filled in, using drywall patching materials. (Standard hardware or do-it-yourself store type of stuff.)
Below: the first few new, custom-sized wooden pieces were cut. This project was done just using cheap, easily obtained pine "one by" lumber from a local do-it-yourself place, which was later stained (with a light-colored stain) and then given some clear coats. Shot below shows the newly-cut pieces being test fitted to the wall; and to each other piece.
Based on my memory of doing this work, and what I'm seeing in these (woefully few?!) pics, I think the only pieces that were glued to one another, all along, were likely the side plates (by which I mean the vertical boards that would be facing the viewer, edge-on, as they stand at the window) and the backing plates (by which I mean the ones laying flat against the wall) for each sub-assembly: one for the left side of the window, and one for the right side. As near as I can tell, and/or remember, all of the other pieces were put together with screws and/or nails which could easily be removed, if need be. For this early testing phase, the boards weren't stained or even sanded yet ... so, there were likely slightly-loose-fitting nails going through pre-drilled (with a drill press) holes through what I'm calling the side plates; and into the backing plates. A few gentle raps with knuckles or whatever, and those pieces would have come apart, at this stage.
I should mention that my "training" doesn't get into doing things like dovetail joints, or any of that. It's all nails, screws, and woodworker's glue for this kid! And most of the stuff I was using, tool-wise, at that time, was pretty much hand-me-down power tools (a hand drill, a jig saw); or borrowed tools (a drill press). A good friend of mine, Frank, used to have a saying: "This sh*t ain't going to the moon!" ... so, yeah, I was aiming for "make it nice" ... but not to the point where the whole project just up and died in the idea phase. And in so doing, I gained experience ... which I later expanded on, again and again ... but I digress, so ...
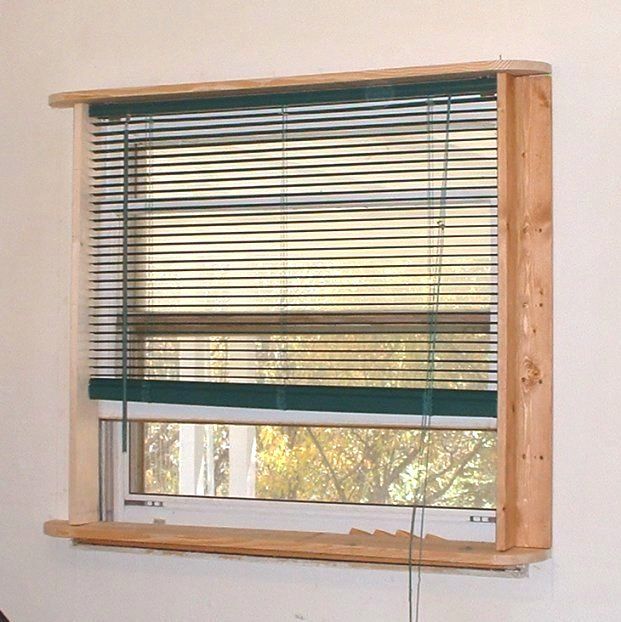
The shot below shows the several mini-shelves we'd agreed on making, being test fitted into their spots along the right-hand side. I must have removed the "L-shaped" arrangement on the left-hand side, temporarily. That side was a mirror image of the right side.
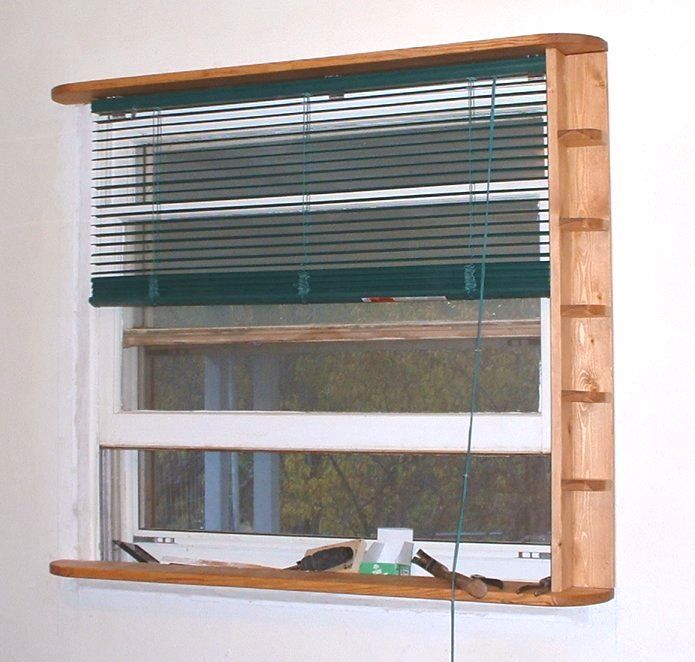
Below: here's a shot of the same basic thing, except with the blinds closed. The overall idea of this project having been to fix light leaks -- with the idea that she would have stained wood on display, being a strong secondary goal; and the mini-shelves being a really nice added bonus for her. In the shot below, you can better appreciate how the "side plates" kept light from being able to go around the corner, at the left or right edges; which had been making it difficult for her to sleep. (Partly because she had just retired, not long before all this work was done, and sleeping late sounded wonderful to her after decades of work; but she was having a heck of a time getting to sleep, and then staying asleep: partly out of old habits of getting up early; and partly from the east-facing window's "leaks".)
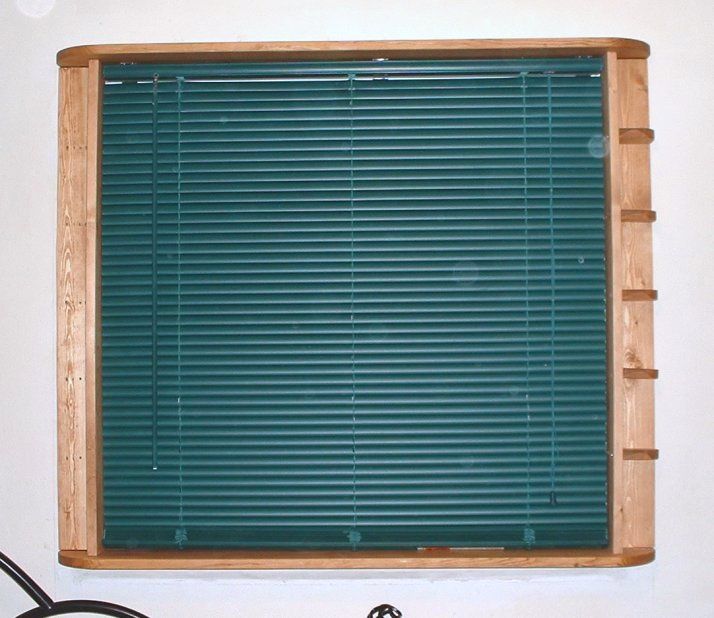
The photo above shows some indication of the way I dealt with visible screws and what not. Studying the few images I'd taken, and remembering what I'd done (as best I can) and why I might have done it: the mini-shelves had another purpose, and that was to hide where I'd used something like drywall screws to attach the two side plate "L-thingies" to the walls. It's been a long time since I did this work, and the how-to pics I took at the time were sort of an after-thought (for which I apologize!) so I'm having to reverse-engineer my own 12-year-old work ... but it looks like what I had done was to figure out how high I wanted each of the shelves to be, vertically speaking ... and then, put one (or knowing me, maybe two; out of paranoia?) drywall screws through the backing plate, and into the wall, at that vertical point. I counter-sunk all of those, so the screw's heads would be flush with the front face of the backing plate (as it were) of each "L-shaped" arrangement, along either one of the side walls.
I had to "premeditate" things, as it were, to hide as many fastener heads as possible; while still having the thing be something I could install or remove, over and over, as needed. Which meant that screws had to be used ... but I couldn't have them VISIBLY used, any more than was absolutely necessary. What I ended up with was a system were two nails were being used sort of like dowels or alignment pins, in a sense: holding the back sides of each mini-shelf level and flat ... (one would have allowed it to tilt, so two were used) ... so that the overall plan was that once everything in the room had been painted or stained, and it was just down to final assembly, I'd screw the backing plates of those "L-shaped" thingies onto each side of the window's frame ... and then carefully slide each shelf onto its pair of nails (which were sticking out, semi-permanently, after everything had been stained and was ready to be put together) ... and once each mini-shelf had been slid backwards, onto the two nails that would hold it up and keep that shelf level, then one final screw per shelf, inserted from the side plate, would sort of be like a "cross-bolted main" on a crankshaft's supports. (Sort of.) Once it was all assembled, the only visible screw heads holding anything on or up were the small screws acting like cross-bolts (in a sense) for the shelves ... with no fastener heads visible, holding the entire unit onto the wall. And even the small screws were at least partially hidden; in that when the blinds were down, they hid those screw heads pretty effectively.
Hopefully, that all made sense?
And finally, here's a shot of the next custom window frame she had me make ... which was just "ditto" on another window, on another wall, in the same room. We had just done one, and then tried it out for a week or so (on the one window letting in the worst early-AM sun) ... but she soon wanted the other window done the same way.
For this one, it seems like I had just copied what I'd done the first time ... except that I was probably smarter, step-wise, the second time around. It looks like I pre-drilled all of the "hidden nail" holes, first; while the little mini-shelves (seen below, just stacked up on top of one another, temporarily) were still "squares". I think I probably did as much drilling as I could, using another friend's borrowed drill press ... but I had the sense that the second time around was a lot easier. I think one reason for that -- (in studying the pics, and seeing how much emphasis I had put on pencil'ing in nice straight lines for each shelf) -- was that I had probably not thought things through, 100%, the first time around; and couldn't easily support the standing-on-edge shelves, face down on the drill press, when I was trying to extend the pre-drilled holes in the backing plate, into the actual shelves. (Which, again, hopefully makes at least a shred of sense?)
With both of these custom frame set-ups, I was likely using slightly-undersized nails, for test fitting and easy dis-assembly purposes. When all of the holes were as lined up as they'd need to be, I could have re-drilled the actual mini-shelves' pre-drilled holes, one tiny drill bit size larger (making the nails a tight, non-moving fit into the backing plates; but an easier slide-on fit, for the shelves themselves) ... and then, once everything "worked," and actual testing had proven it could be easily assembled and/or taken back apart, I would have taken it all off of the wall for staining purposes, and for a final clear coat on each sub-assembly.
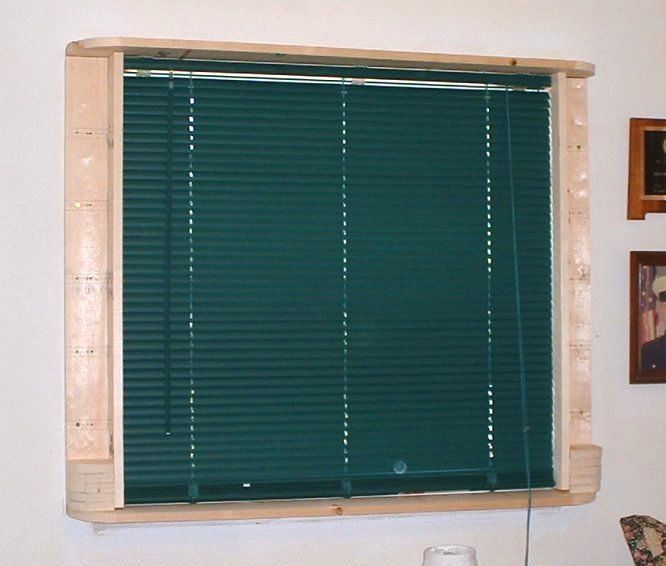
As far as a final-final set of "after" photos, sorry. I looked and looked on my computer, but I didn't come up with any ... but you likely get the idea even without them. Some stain and some polyurethane later, these custom window frames, with extra storage along the tops and side, were done. One final "pull" off of the walls, and then some scrubbing of the walls and whatever priming and painting of the walls needed to happen ... and Nelma's remodel of her room was complete.
So ... having explained all that (in hopes that others might "steal some ideas" ... I'll get back to discussing the big hole I made in my bedroom wall, this week ...
Some of the next steps are kind of "routine" for me, since I've done something very similar to this, once before ... and some parts, I'll need to think through rather carefully, so that I don't accidentally eliminate any options that I'd think were cool, down the road, on the "fun side" of this wall. This project, although similar in some ways to that other project, isn't exactly alike. Alike enough to have "sold the idea" ... but not enough for me to just jump into each of the next steps. The differences I can see now boil down to these main ones: I don't have a pre-made window's frame, ready to install, this time. And I'm gonna want some kind of a "privacy option" installed. Which is gonna take some thinking, since I might want glass on both sides of the wall. And I'm not yet sure how "deeply" I'm gonna be "sinking" each side's glass. Or if I'm gonna make the "boring side" of the wall be a permanent glass installation; or if both sides will be easily removable. (Might go with thick plexiglass, instead of actual glass. (I have some plex' sitting around, that might fit the bill nicely. And it's a lot easier to cut, with ordinary tools, etc.)
I'll plan things for a few more days, and then get back to actual measuring and cutting and nailing and what not.
Meanwhile ... I have plenty of boring chores (like cutting grass, etc.) that will take up "free" time. (While being easy enough chores to let mental gears turn...)
I think I have a pretty good handle on what I want to do next; but sleeping on it before doing much more, can't hurt. Once I catch up on planning things, in more detail, probably the first / next steps will be to establish a nicely level/square/plumb/flat "base" area for the window frame I'll be making. And I'll go from there.
I'll take pics as I go. If there's any interest, maybe I'll do a bit of a "build thread" about parts of this, over in the newly-installed tips-n-tricks sub-section. (Since, to me anyway, this thread seems like it might get clogged up in a hurry with "in-progress" stuff ... rather than posting "finished" pics of people's work spaces.)

