|
|
Post by barten on Dec 7, 2013 8:45:58 GMT -5
I love this one too! ! ! I liked the extra texture on the underside. . . goes with the toon theme. . and also might be more visible in the shadow of the body? Love to watch the progress and thanks for all the commentary. It makes everything come alive! IT"S ALIVE! ! !! !  Great stuff! GB barten |
|
|
|
Post by wardster on Dec 7, 2013 12:18:25 GMT -5
Thanks much! I've been working on another model, of late ... was bouncing between them, actually; but had to work for a bit just on the other one, as seen on this off-topic forum: www.eagletransporter.com/forum/showthread.php?t=156062... but I'm about to take a short break from that big ol' monstrosity; long enough to get back to working on this one a bit more. The main turret piece just needs some touch-ups, here and there; and then I'll likely make an RTV rubber mold of "what's there" (will have to put some more rubber on order first, though) ... that is, I plan to make a mold of the "bare" turret's shape, minus any added detailing work (texturing, pistol ports, whatever; plus of course working on the tank's main gun pieces) ... and then cast up some resin copies of the "bare" turret's shape ... but as a "right now" thing, I'll see what I can do to push the touch-ups along.  I'll try to get more work done / pics taken, of the turret's work or whatever; and get those posted before too long. Thanks again for the interest, guys! |
|
|
|
Post by ira on Dec 10, 2013 12:57:59 GMT -5
Thanks much! I've been working on another model, of late ... was bouncing between them, actually; but had to work for a bit just on the other one, as seen on this off-topic forum: www.eagletransporter.com/forum/showthread.php?t=156062... but I'm about to take a short break from that big ol' monstrosity; long enough to get back to working on this one a bit more. The main turret piece just needs some touch-ups, here and there; and then I'll likely make an RTV rubber mold of "what's there" (will have to put some more rubber on order first, though) ... that is, I plan to make a mold of the "bare" turret's shape, minus any added detailing work (texturing, pistol ports, whatever; plus of course working on the tank's main gun pieces) ... and then cast up some resin copies of the "bare" turret's shape ... but as a "right now" thing, I'll see what I can do to push the touch-ups along.  I'll try to get more work done / pics taken, of the turret's work or whatever; and get those posted before too long. Thanks again for the interest, guys!
Wonderful Albatross Article!
Amazing Work Ward...  |
|
|
|
Post by wardster on Dec 26, 2013 14:02:47 GMT -5
Thanks much, Mr. Ira!  What with the holidays and other Real Life stuff going on, the big airplane (on that other forum) is not getting much "bench time" either ... but I haven't forgotten this fun little 'toon project. Just trying to make some time for hobby stuff ... which means getting Real Life stuff done and over with, first ... but, sometime in early 2014, I should be able to get back to my fun projects. |
|
|
|
Post by wardster on Mar 15, 2014 21:00:09 GMT -5
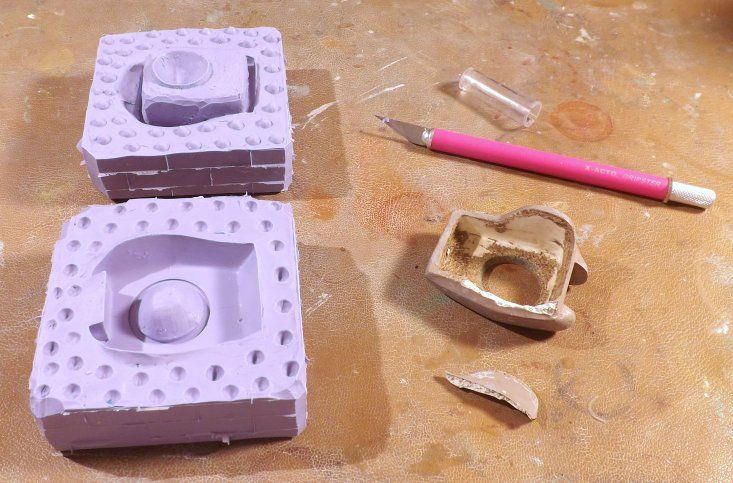
Okay ... soooo, it's been (quite!) a (long!) while now, since my last update on this project ... and due to Real Life, I'm still trying to find time to work on this in between several other, larger and/or deadline projects ... which all adds up to "unfortunately, I probably won't be wrapping this project up, anytime super-soon? ... but, an update is an update, and it's been too long, so here goes another in-progress shot. 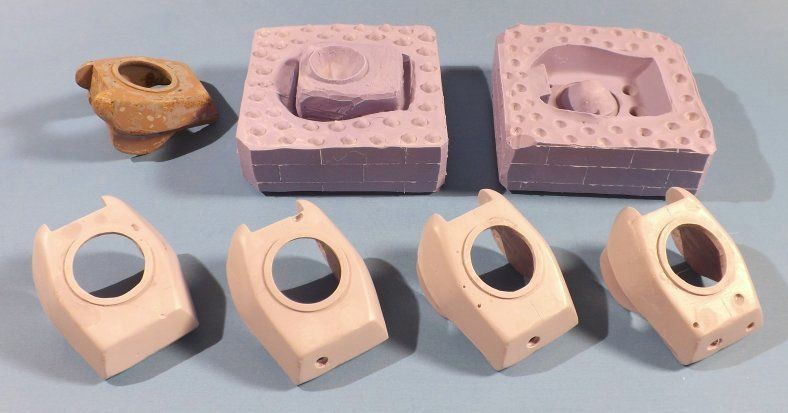 Yes, I made a few resin castings of the turret piece. Why do that, at this stage of things? A few reasons, actually, but one is: I'm treating things like these resin castings are "intermediate masters" rather than "final-final masters". In other words, I'll re-work one of these a bit. I'll keep going on that piece, rather than on the older "initial master" part ... but as long as I had the mold made, I figured I'd make a few extra castings. They're still in need of some refinements and additions, so this isn't a "final production" kinda mold; just something to take me to the next step in the overall process. I only really needed one casting, for myself; but I also wanted to tweak the mold itself and my procedures in using it, so I made three extra castings: more or less to get some more practice, etc. Anyway, I mailed one of the extra castings to a buddy of mine (Hi, Brian R.!) who had just asked me, not too long ago, if I had any trade bait hanging around, in exchange for some stuff I had recently bugged him for. The other two extras got mailed off, too, to a different person ... but I'll say more about that when it arrives at that person's house. For now, let's just say that the Russians in WWII had several different factories cranking out slightly different versions of their tanks; so, I think it would be cool to have more than one "factory" making any final parts. More on that, once the person I volunteered, finds out they got volunteered.  For what it's worth, the rubber and resin I used are both Smooth-On products. For the "almost primer gray" color, I just dyed "Part B" of the casting resin with some Sharpie Juice; otherwise, it would have been bright white ... and because it makes it so hard to see highlights, etc., I try to avoid all-white castings! ADDING ADDITIONAL PICS, MUCH LATER:
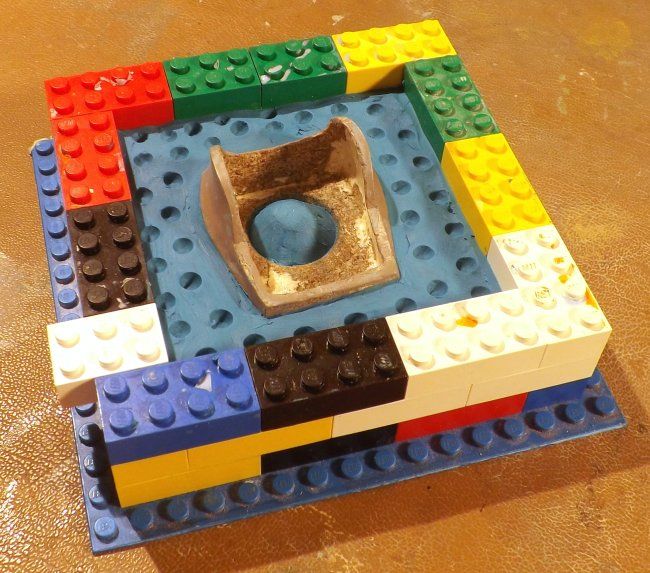 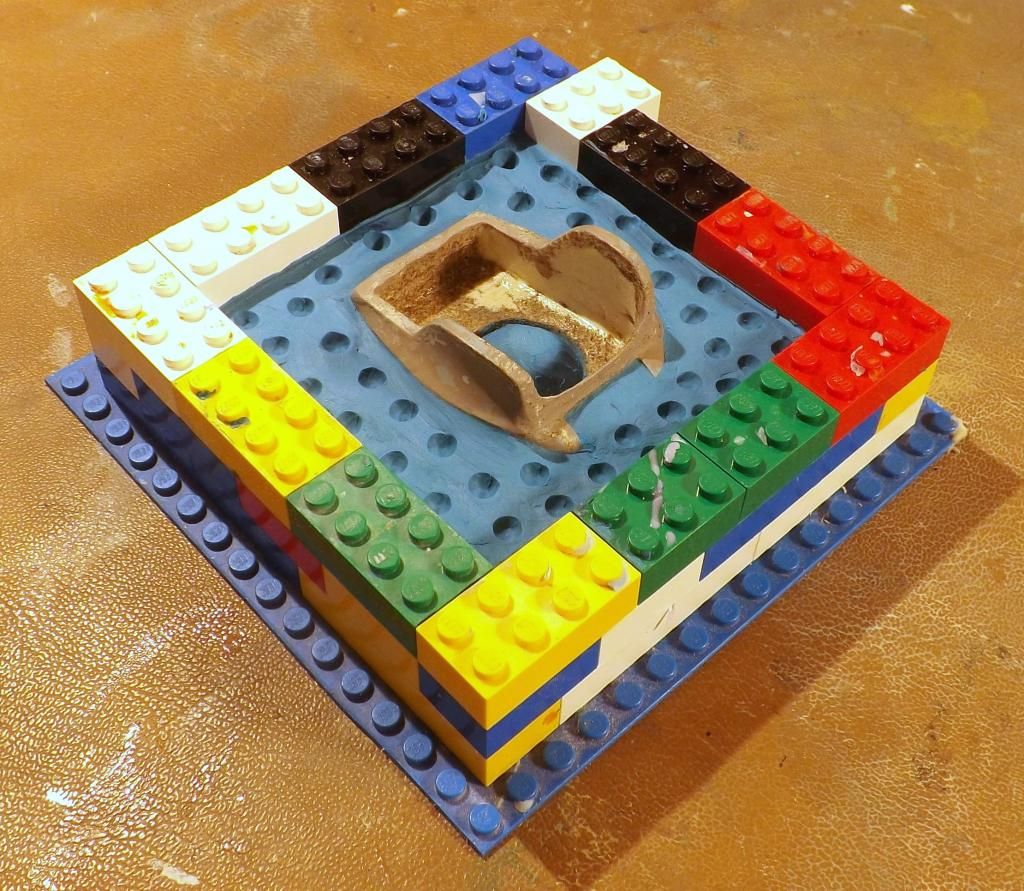 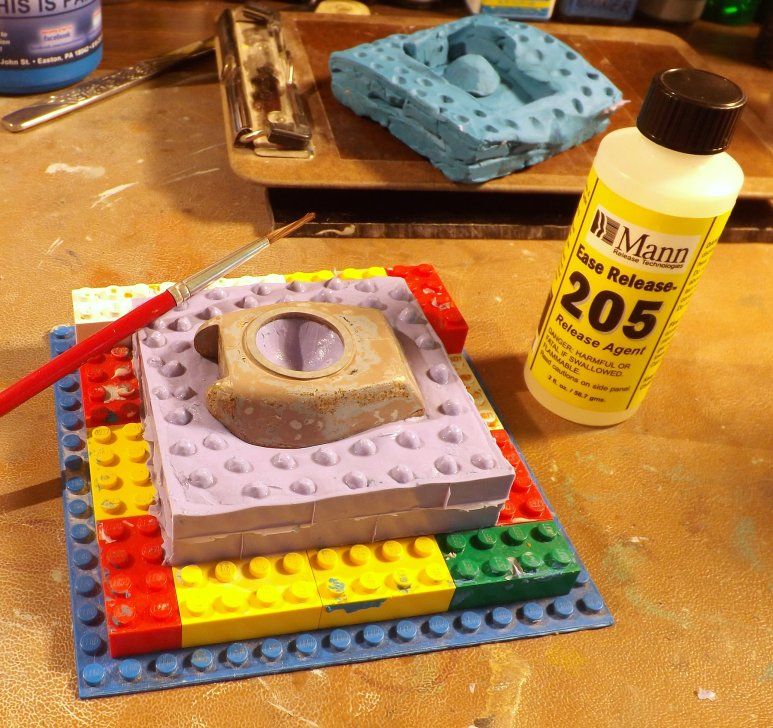  |
|
|
|
Post by TooOld on Mar 16, 2014 7:51:27 GMT -5
Those castings look great ! I'm going to switch to Smooth - On products , I don't really care for Alumilite . It will be cool to see a bunch of these tanks invading us !!  |
|
|
|
Post by wardster on Mar 16, 2014 16:14:56 GMT -5
Those castings look great ! I'm going to switch to Smooth - On products , I don't really care for Alumilite . It will be cool to see a bunch of these tanks invading us !!  I have a professional model-making friend who (assuming nothing's changed) loves Alumilite's stuff -- I guess for some level of extra hardness? -- but I really like the Smooth Cast 300 "liquid plastic" that Smooth-On makes. Buying direct from them is easy, and cheap, and insures that it's a fresh batch. I've found that un-fresh resin is the cause of a zillion common problems. (Didn't realize how easy / pleasant resin casting was supposed to be, until I started buying fresh stuff, direct from a manufacturer!) On "a bunch of these tanks invading us" ... hopefully, they'll behave and won't do that.  I was thinking more along the lines of pre-Cold War era stuff: the Russian front in WWII, and so on. Gotta have some incentive for Revell to re-release the "Swine Hunt"! But yeah, I'm hoping this spreads a bit; and we all get to see more cool "Lend Lease" tanks with Russian stars on them. (Hence volunteering someone, by sending them two "finish me, and make copies" turrets. Fingers crossed, that the plan works!) |
|
|
|
Post by wardster on Mar 18, 2014 4:21:02 GMT -5
Coolness. The castings I had mailed out, arrived ... and so far, the feedback is good. I have my fingers crossed that a certain person -- who knows who he is, now (heehee!) -- will be able to find some time, at some point, and may want to take me up on an offer I had made him. More on that, when our talks get farther along. (I kinda surprised him, I think, with the castings and the offer.)
Anyway ... with luck, hopefully there will be some good news before too long!?
|
|
|
|
Post by Starryeyes on Mar 18, 2014 20:20:21 GMT -5
Well, well, well.. who would have thunk it ... I received a couple-a turrets that resemble those on a familiar looking Russian DW tank! .. this only means one thing ... WAR ! ha!ha! .. looks like I'll be building a DW tank in my future.. also a possible surprise down the road for a few brave souls .. A big thanks goes out to my pal Ward .. one awesome guy - you da man !! stay tuned !
|
|
|
|
Post by wardster on Mar 19, 2014 19:15:25 GMT -5
(Blush!) Thanks, man!  |
|
|
|
|
|
Post by wardster on Apr 22, 2014 13:48:14 GMT -5
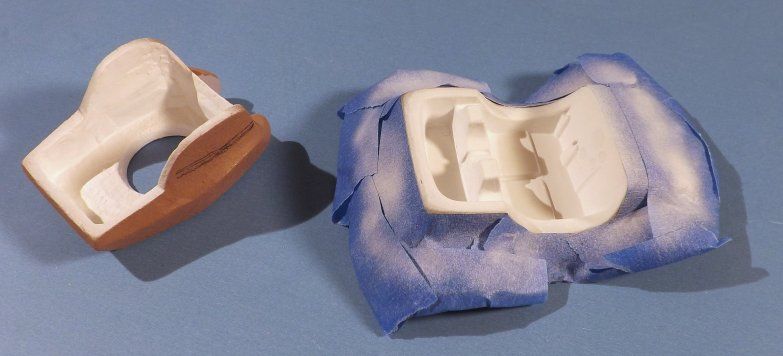
Thanks much! By the way, I'm still working on it a bit; here or there. I had temporarily painted the innards white, to see if you can actually see anything on the insides, through that upper hatch. And yeah, you can see quite a bit. Which means some improvements to the innards are in order. So, now I'm trying to figure out how best to modify the existing rubber molds, to have a better interior. (So far, I mainly concentrated on getting the exterior bits the way I wanted them; and just got the innards so that they're hollow -- but not totally as I wanted the actual interior to be.) I don't do much "hollow interior" casting, so this is sort of a new deal to me; and I'm learning newer and better methods, as I go. Anyway, the left and right side walls on the turret casting had to be really thick before; with mostly straight-up-and-down walls: to get the cast part out of the mold. (Otherwise, there would be two really nasty "undercuts" on the left and right sides, where the outer walls bend outwards. I actually broke the original master part, getting it off the rubber, on my testing phases of things; so, I had to cut the rubber walls of the bottom half of the mold, more vertically, to make it work.) I'll play more with it, over time -- but for now, just to get this first model done, what I did was to custom-grind out the innards; to get the interior the way I want it. (Well, more or less, anyway.) I'll probably make a second mold, later, based on the altered casting -- but for now the main thing I wanted to do is just to try to figure out how it'll all look, with the interior ground out. More pics later! (Pic added in later.)
 |
|
|
|
Post by wardster on Jul 10, 2014 2:24:54 GMT -5
Okay ... finally gonna get an update going, on this build.
Basically, real life kept me from doing much of any hobby stuff for way too long ... not just this project, but all my other ones, as well ... but, months ago, before I had to "down tools" on my hobby projects for a while, know that I had taken a bunch of photos of other work I'd done on this project ... but, didn't have the time to sort through / adjust / upload, back then. So, before I get any actually-new progress going on this Deal's Wheels "Never Was," lemme start by uploading the older pics that haven't yet been seen.
|
|
|
|
Post by wardster on Jul 10, 2014 3:49:03 GMT -5
Okay. I feel a bit like a time-traveller, but I've retroactively added in nearly three dozen "new to you but old to me" photos, to the preceding pages. Just edited each posting, to add in the relevant bits. It's not perfectly linear, doing things that way -- and may take some studying or head-scratching (sorry about that!) to figure out what went on when -- but it beats the alternatives. (That is, no new pics at all; or excessive scrolling back and forth, if I had posted them as "new stuff".) Anyway ... the newly inserted "missing links" pics should explain the earlier sequences, a lot better than the old way! But, unfortunately, that means you kinda have to go back to page one, message one in this thread, and start over; to make the most sense of things!  |
|
|
|
Post by wardster on Mar 22, 2015 14:28:06 GMT -5
Back to picking up where I left off. (About a zillion ages ago! Sorry about that, folks!) 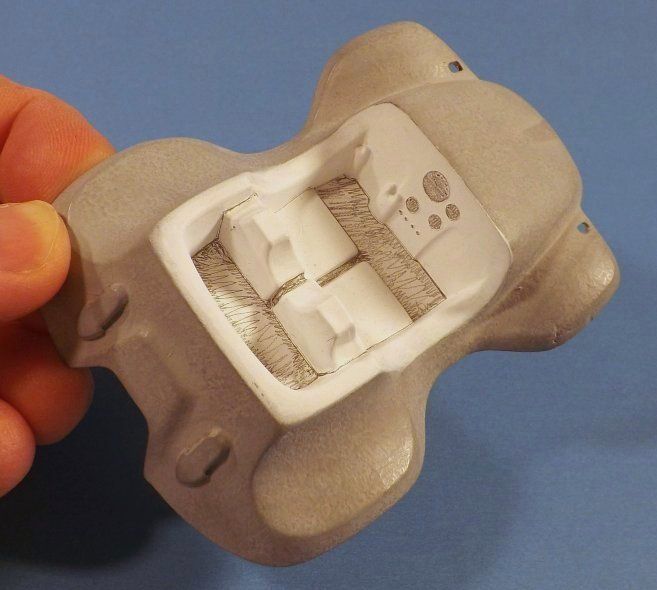 After painting (airbrushing) the whole interior white, I cheated a bit, using a mechanical pencil: to better define where the edges of other colors would end up going, when I got around to painting them on. Just makes it oodles easier to see what's going on, since trying to find the edges when you're doing the actual painting, is a pain when you're looking at a white-on-white surface. The next pic was an aborted experiment, to try to turn the two-piece rubber mold into a three-part'er ... but I could see it wasn't going to work well, so I left that where it was; with the idea of ordering more casting materials, at a later time; and creating a three-part mold from scratch. (More on that, a bit later on.) 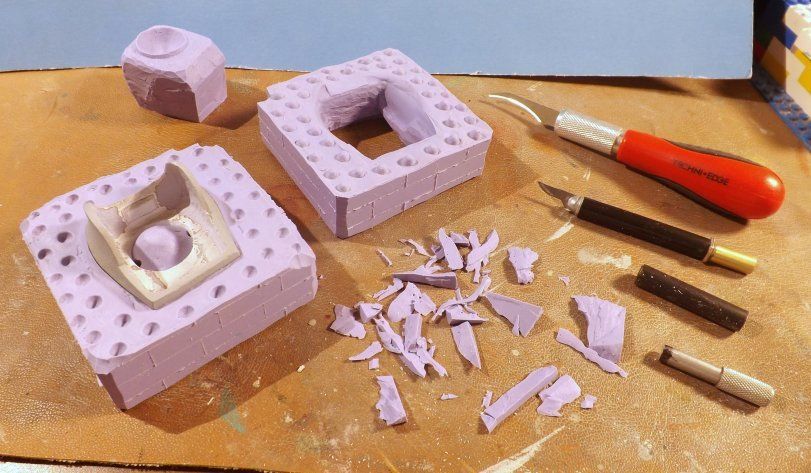 The next two photos show a (variation on a) trick, which I just taught myself; and will explain momentarily. 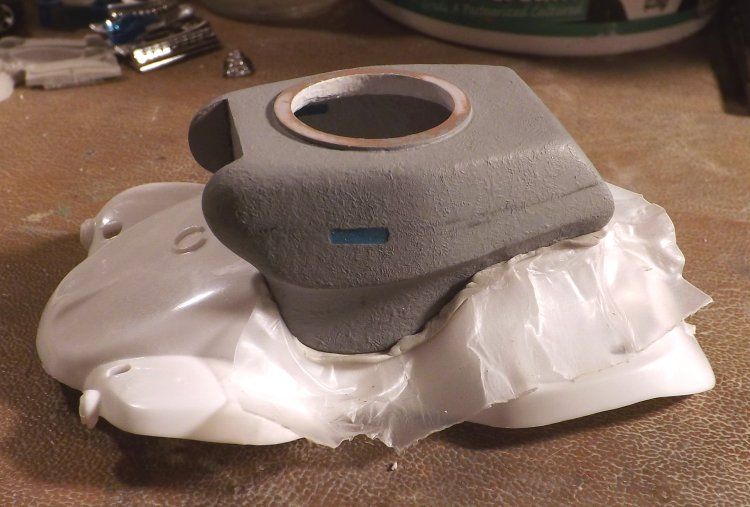 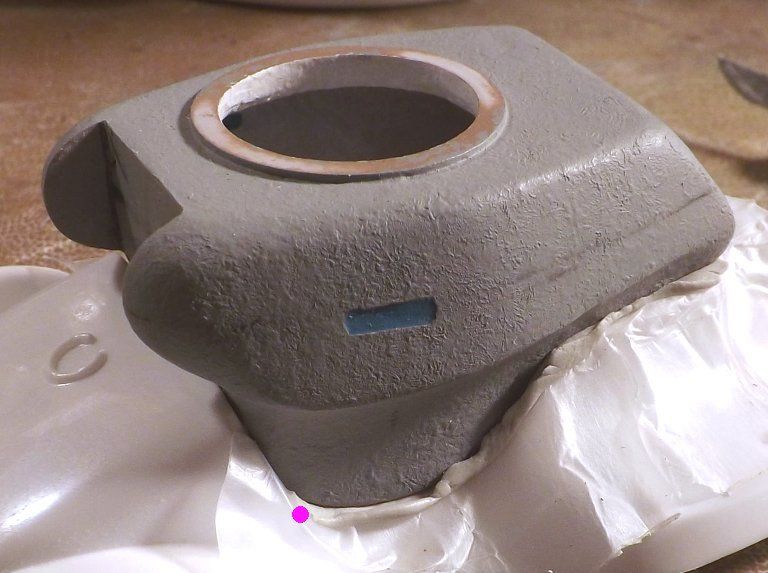 Basically, what's going on in the last two pics is that I wanted to tighten up the fit of the hollow turret piece -- (which is actually one of the four resin castings, made before: not the original master part, shown earlier than that) -- where it sits on the main body of the Glitterbug cartoon dune buggy kit. The fit wasn't horrible: it just could have been better. Still, I love learning new tricks ... and this one I'll definitely be using again, so I'll explain it in some detail. I knew that if I had applied a snake-like length of mixed two-part, epoxy-type of sculpting putty (specifically, the "Magic Sculp" or "Magic Sculpt" brand) to the bottom of the turret piece, or the top of the body piece, and then squished the body and the turret together, I would end up with a filled gap -- but if I did things that way, I would also end up with those two main pieces more or less permanently stuck together. Yes, I wanted the gaps filled ... but no, I didn't want the turret and the body pieces to stick together. (Because I'd be making another mold of the turret, later. I wanted the fit to be as perfect as possible, right out of the mold, whenever I made more castings.) There were a bunch of things I could do, to accomplish that goal ... but they all had drawbacks I wanted to avoid, if possible. For instance, in various articles and what not I've absorbed over the years, I've seen people use all sorts of mold release materials (Butcher's Bowling Alley Wax is a great one, but others exist) ... or paper-thin barrier-type materials (including masking tape, at times; since its' thin; sticky on one side; and the upper surface is essentially pre-waxed, in a sense) to do something like the specific task I wanted to do here ... but I hadn't run across anyone using a product called "Parafilm" as a barrier or mold release agent. And to be honest, I wouldn't have thought of it, myself, except that after re-organizing my shop areas, and de-cluttering it, it was right there in front of me. So, long story shorter: I gave it a try on a different project, and it worked great there; so, I figured I'd give it a shot here, too. ("Nerdy Notes" time ... then, I'll do the actual explanation of what I did.) "Parafilm-M" is the actual name of the stuff I used. I had some for over a decade; so maybe the name changed a bit over the years? (Maybe, or maybe not.) I was told it actually was invented as a sealing agent, for medical uses. Sort of like a form-fitting, gasket-like material, to perfectly seal glass bottles shut, etc. Parafilm used to be popular with figure modellers (and still might be, for all I know?) a number of years ago (when I first bought it) for masking off large areas with very difficult surfaces: where things like normal and/or hobby masking tapes could not easily be applied. They used it to mask off large areas where you'd have a heck of a time using those products. I didn't need anything "masked off," though ... so, initially, it hadn't occurred to me to try to use the Parafilm product. For what I'm doing here, you can think of Parafilm sort of like waxed paper -- except stretchy. Where something like waxed paper wouldn't work, because it can't stretch (and would thus wrinkle up or fold over on itself, or might even rip or tear) the Parafilm product, I'm finding out, works just fine ... because, in those difficult areas, with various "hills" and/or "valleys" the product "gives" and conforms to whatever it's being laid over. Which, all in all, gives you a more-or-less paper-thin barrier; but with a waxy (mostly "non-stick") surface; and it also leaves no residue. (That I can detect) so there's no clean-up afterwards; and no worries that primer or paint may not stick properly. All of which makes Parafilm-M feel to me like a heck of a lot better option than waxes, or other chemicals; as well as kicking butt on various non-stretchy "tapes". It has limits -- (what product doesn't?!) -- like being relatively small, sheet-wise ... but for what I'm doing here, it's more than large enough to get the job done. On to the explanation of the actual how-to: I basically just put some Parafilm over a (spare, unmodified) body part, to protect that kit piece; then applied a snake of mixed Magic Sculpt to the back half of the turret (from the dot, back) and then pushed the two parts together; let the Magic Sculpt cure hard by waiting for a few hours) ... and repeated, up front. A bit of careful tearing off of the Parafilm product, from the turret piece, after everything had hardened up properly ... and I was done. Super fast and efficient! End result was a form-fitting, virtually-gap-free fit between the "intermediate master" turret part I was working on; and the unmodified Glitterbug kit's body. Which brings me back to casting up some more copies of the new-and-improved turret piece. (Which I'll get to explaining, when I get a bit further along on doing that!) |
|

