|
|
Post by wardster on Apr 19, 2021 21:05:42 GMT -5
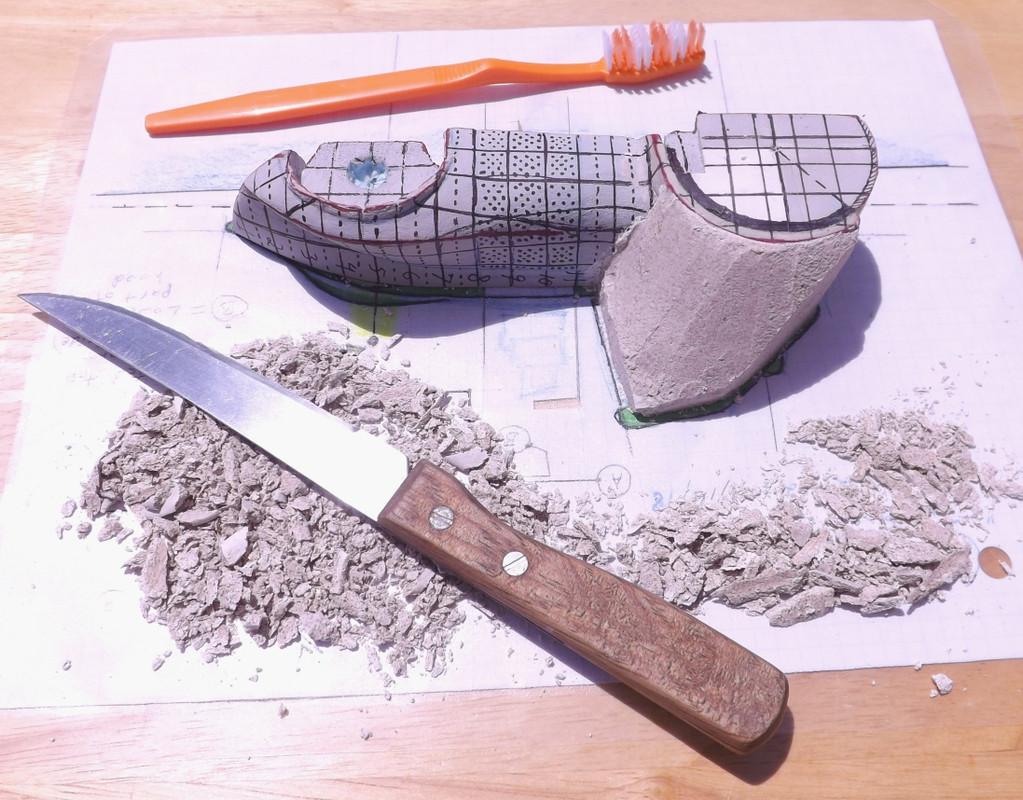 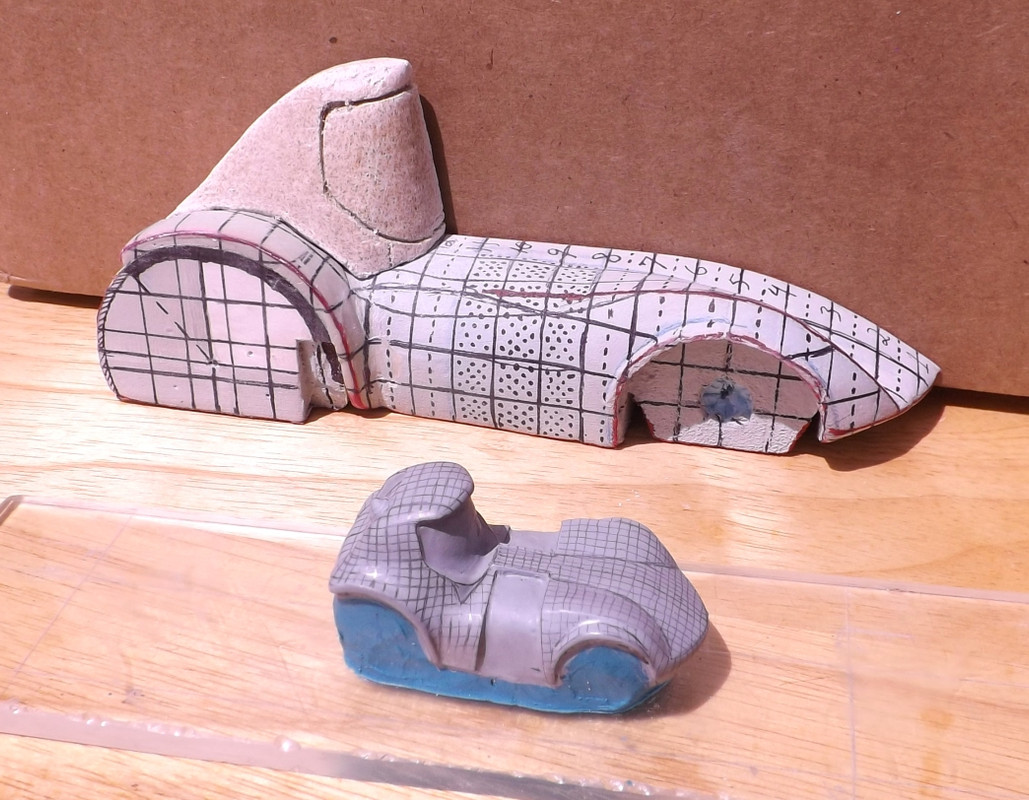 I'll try to go "lite" (by my standards) this time around, on overall word count: What you're looking at, with these two new images, is the raw start of the "figuring out the shape of the cockpit area" part of this multi-step analytical of "sculpting with slices" process. What you're seeing in the first image is that mixture I mentioned, before: of Dap-brand Presto Patch powder, mixed with finely-ground vermiculite and also some talc; then of course, water to activate it. This is sort of an under-sized-on-purpose blob, that got tacked on, and then cut back a bit: enough to see the edges of the drawing, underneath. I'm more than likely going to go through multiple rounds of "add, then subtract, then repeat" before this stage of things is done enough to move forward. The toothbrush is in this image because I used the back end as a spatula, to apply the mixed-up P+V+T mixture. Second picture shows the tiny diecast car, with the "enlarged" half-hull model behind it. Note that in this second shot, the goal isn't to duplicate what's seen on the small car, as-is; at least not yet. The P+V+T "blob" that's being shaped is sort of an "inner core" that's going to have a thickness of some harder material laid over it, at a later stage. I'll focus on the windshield area, first, later on, and will likely "wing it, by eye" from there, as to what sub-areas look okay, and which aren't yet right. |
|
|
|
Post by jcon on Apr 20, 2021 11:47:24 GMT -5
I am so enjoying watching you bring this together!!! Thanks for sharing your process with us, this has been a treat!!!
|
|
|
|
Post by wardster on Apr 21, 2021 1:39:17 GMT -5
I am so enjoying watching you bring this together!!! Thanks for sharing your process with us, this has been a treat!!! Thanks, man! Very cool of you to say so! Today's version of that "process" was just staring at what I did, yesterday, with the diecast car sitting very close to it ... and thus seeing all of the "ummm, no, that's not quite it" areas or spots. The more I look, the more "ummm, no" areas I find, but I guess that's the point. You have to start somewhere, and giving yourself permission to make a series of mistakes, is actually a good thing -- as long as a person has the patience not to proceed with the final-final model's shaping, until it all looks right. I know that the windshield, for instance, isn't located (fore-and-aft) where it's supposed to be, for the time being (since I left some thickness off or out, in that area, so I could layer on some harder material, in that fairly critical area) but it is still really bugging me that it appears to be mis-located. I keep trying to tell my brain, "Ssshh, that's temporary, and it's on purpose" but my brain ain't buying that as an excuse. Like an insistent but helpful little kid, it keeps telling me, "No, it's wrong; look, it doesn't line up with what it's supposed to line up with, either from the side view or from overhead" ... and so on. I definitely need to get that windshield dealt with, before I do too much of anything else on that newly-being-figured-out cockpit area of that vehicle. I think that's going to be the "Rosetta Stone" for telling me what else I've gotten wrong, as I progress forward. I also have more sculpting materials (fresh stuff) enroute / on order. A bunch of stuff is on order, actually, but isn't here yet. Some I might use on this project. Others are for more general purposes. I guess I'll see what I use, when it all gets here. The ultimate compliment, of course, is other guys trying out some of the materials I'm using; or the techniques. I'm partially going into all of this step-by-step detail, in the hopes that some of the guys here (or the non-members who are looking at this stuff we're all working on) might "give this a go" -- not so much this exact subject, but the methods and/or the materials. When I get to the wheels / tires, a method called "screeding" will likely be used. The "Feb 2002" back issue of "Fine Scale Modeler" has an article on that, by that David Merriman guy I mentioned, before (as someone I learned a lot from). Pages 48 through 51, if any of you folks out there think you might have a copy of that back issue in your collections, somewhere. Last comment, for tonight: has anyone else ever considered "Whose Yer" as a smart-alecky name, for toon tire sidewalls? |
|
|
|
Post by jcon on Apr 21, 2021 21:47:58 GMT -5
I love the tire name!!!
|
|
|
|
Post by sharp on Apr 22, 2021 8:01:01 GMT -5
Sounds like a cool name to me!
|
|
|
|
Post by wardster on Apr 22, 2021 19:48:17 GMT -5
Glad the folks here like the idea of "Whose Yer" tires as an option, on future toon vehicles! Feel free to "steal" that tire name, fellow forum members, and use the idea as you see fit (including decals, etc.) on your own projects!
|
|
|
|
Post by wardster on Apr 23, 2021 6:31:16 GMT -5
I think I have something figured out, process-wise, but I haven't yet "done it".
I think I'm going to treat the semi-shaped "blob" of P+V+T, that is my "first draft" version of the cockpit area, as just that: a first attempt at things. A version that I'll leave alone, as-is, and will move on to the next version, as a separate part, as quickly as time and motivation and techniques will allow. The transition between "version one" and "version two" will (or so I'm planning it, now) be marking off some horizontal lines, and doing the 2D contour-gauge process, to put things onto paper. Then, probably switching to "slices" -- a bunch of them -- that I'll stack up, vertically. That way, I figure I can "toss out one slice of bread" if it's not correct, and "substitute a different slice of bread" in that same "slot" or "position in the pyramid" (as it were).
Something that makes this planned methodology, for the next few steps, seem like a good idea is "blueprint bashing" -- which is my homemade term for working out some of the details in 2D, on paper, and in my head, without necessarily having to do that whole "adjustment" process in 3D. If I can "see the corrections" in my head, in 3D, I can "adjust them" in 2D, as well.
Examples of that, in completed form, would be those skeletal 3D models of various aircraft, or other fairly-complicated 3D forms.
In a sense, it's sort of like treating each sub-assembly as a half-model, in that you're not necessarily "building the whole thing" -- but there's a lot of visualizing work that is really hard to explain, without having something in 3D that I can photograph.
Think of it, maybe, like baking a pie -- but you're giving yourself the option to adjust the recipe for each "slice of pie," at any point in the process. Pull any slice out of the whole, and adjust what you need to adjust, and put it back into the "pie".
No pictures of this all happening, yet, I'm afraid. This time, since this time is mainly a "planning things" stage, it's all words.
I think the "3D stack of slices, in pyramid form" would be the best direction to take, with the way the slices of bread will be oriented: stacked up on top of one another, not "standing up, on edge" like an actual slice of bread, in an actual loaf of bread.
Taking one's time at the visualizing stage of things, step-wise, or process-wise, can sometimes save oodles of time, later on. In this case, for photo-purposes, I may have to "invent something" in a sense: some method of making foam slices be a specific thickness. (Woodworkers have "thickness sanders" for that type of thing.) I would like (ideally) to have the option of "alternating colors" of that foam -- either blue or pink, for each slice -- but we'll see, as I go.
It is hard for me to know how to say the "why" of this choice, but it's an important choice to go from 3D to "mostly 2D" and back to 3D, as rapidly as possible. Sometimes, once a person's head can wrap around the ideas involved, visually speaking, "it's just easier". In this case, I can picture thickening a certain area by this much; and a different area by another amount ... and it's easier to "just draw it" than to actually build it, by refining the original 3D test-model. The choice to sort of "abandon" this test model isn't a bad thing: I'll be "taking the lines off of" that test-model, in 2D, before the re-draws happen; and the "sculpting with slices" process plays itself out. If you're comfortable with the various stages, methods, you can "jump from one to the other," whenever one way of doing things seems more appropriate in that moment, for whatever your goals may be.
|
|
|
|
Post by jcon on May 22, 2021 11:22:46 GMT -5
Any new updates on this awesome project my friend? I agree with the different thicknesses of the slices as I have used that technique before in bowl turning on my wood lathe in the past! Whatever you choose I am always here to follow along and learn new techniques!!!
|
|
|
|
Post by wardster on May 23, 2021 1:47:08 GMT -5
Any new updates on this awesome project my friend? I agree with the different thicknesses of the slices as I have used that technique before in bowl turning on my wood lathe in the past! Whatever you choose I am always here to follow along and learn new techniques!!! Thanks for that vote of confidence, sir; and your interest in this project! As of right now, there's nothing new to see. (Sorry.) But I haven't forgotten the project, and it's still sitting in quick/easy view of my PC's monitor, to remind me to "get back to it". On a more positive note: I am learning some more techniques, here and there. I've learned to (with some minor success, but not what I would call "full success") sort of "dye" the "P + V + T" (or whatever I'm calling that substance) so it's more like a gray color, instead of a "too starkly white" kind of thing. I'm also playing around with other techniques that might help this project along, at a later stage ... some of which amounts to learning a lot more about what sculpting tools others use, and/or create, for either the kind of sculpting work that is "additive" or, alternatively, is more generally "subtractive in nature". I think the weirdest thing I'm dealing with, right now, mentally speaking, is the idea that I'm finally "facing" that this is a form of sculpting. It may not be "figure sculpting" but there's a niche out there, for whatever form of sculpting this might be called. All my life, I've had a definition of "sculpting" that didn't include stuff like doing this. So, in sort of "accepting that I'm a sculptor" or at least, arguably might be one, that sort of "pushed me sideways" a bit, into deeper explorations of that hobby. Somewhere out there, in the big wide world, I had the idea implanted in my head, that if you're "thinking about it, while you're doing it, it's not sculpting". Which makes no sense, now that I'm examining that, "in the light of day" (and now that I'm even conscious that idea, somehow, snuck into my head, without noticing it, over the decades). Thinking about it, consciously, I decided that's simply silly. I mean, really: is the Statue of Liberty a piece of sculpture, or an engineering exercise? It's both. But I had let other people tell me, ages back, when I was an impressionable youngster, that "thinking about it" makes you, somehow, "not an artist". If you're truly NOT thinking about it, how could you do anything artistic? Really, just to breathe, a part of your brain is constantly processing information. So that saying I had accepted, without being conscious of, for all of those years where I was telling myself, "you're not a sculptor" boils down to sheer nonsense ... as I see it now, anyway. And those explorations, while beneficial to me, personally, don't result in things getting done, on this detailed toon project. I'll try to make more of an effort to get something actually done, on this model. It feels overdue, so thanks for the "push"! |
|
|
|
Post by wardster on May 23, 2021 3:10:33 GMT -5
Since there's nothing new for me to show on the "car" itself, for right now, I'll show a sneak peek at two of the homemade sculpting tools I came up with, for working on stuff like this, where it's mostly a subtractive process (at least at certain parts of the game). 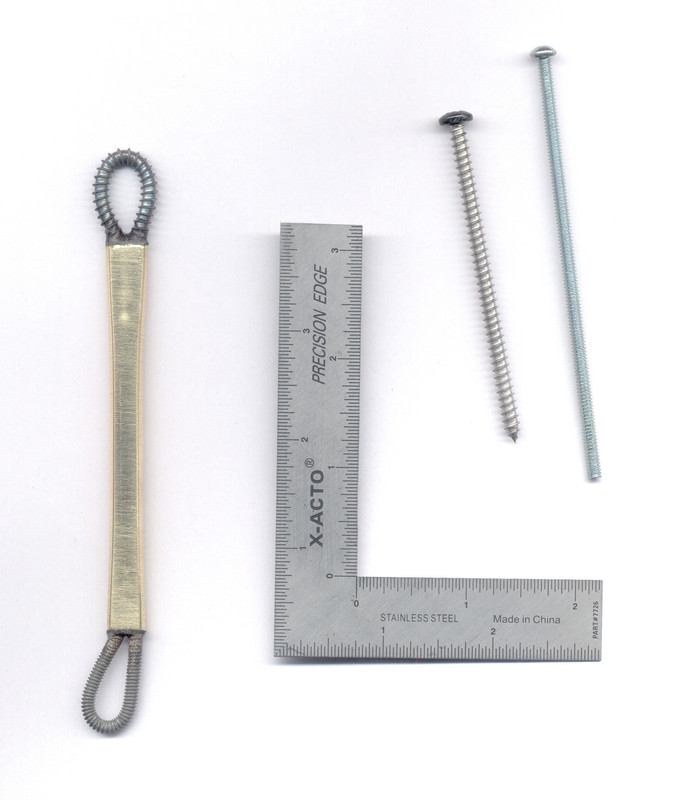 The one above was made recently. It's basically two screws, which both got annealed (heated with a small torch, and then, allowed to cool naturally in air) and then bent / stuck in a handle. The idea is essentially to have created a small "riffler" file. I already mailed this one off, to someone else, to get their impression of it. I'd have to make myself another one, to use it on this project, but having done it once, it's not that super-duper difficult. The only big deal is safety, due to the open flame.  This one is older: the handle has been kicking around for at least a year, probably longer. I cracked it, with these types of "tool heads" on it. They're just ordinary left-over Dremel-style sanding drums, with the shank portion all bent, on purpose. One side can be course, and the other can be fine. Those are just 3/8th's of inch thick dowels, with holes drilled in both ends; holes that were sized to fit a standard Dremel moto-tool's tools. The "tool heads" (for lack of a better description) are just press fit, into the holes. I sent some of these to a buddy, a long time back. He mostly likes them. We're going to play, a bit, with some longer ones and some larger diameter ones, but overall, the idea of "empty handles, to put tool heads into" is not a bad one. If you're not epoxying them in, or whatever, it's easy enough to pull one tool head out, and substitute another. The image below is something like "pen blanks" ... but without actually being exactly that. Plans not yet tried may not work, but pushing that aside: I'm treating square section "garden stakes" I got from Tractor Supply as if they were slightly under-sized "pen blanks". I had to band-saw them into five inch lengths, and they're more like 5/8ths of an inch by the same, rather than the standard sizes (0.75" by 0.75" by I think five inches in length) used in the "pen turning" part of the wood-working hobby ... but all I'm planning on doing is drilling some holes into both ends; mounting these on a small lathe, using those holes; and "rounding" the bodies off, on that lathe. I may leave a part of it fairly square-shaped, for not falling off of the table or workbench. This particular batch of wooden pieces came about due to a lack of square-section dowels, in my town. The store where I got these told me, "No, we don't have that" when I asked for those ... but the young man who was helping me, continued on by saying, "But you might want to follow me, to where we keep our garden stakes". To be honest, most that were there, I would pass on (and did) ... but three sticks in particular, I really liked, in terms of looks, and especially for the price. It was about $2 or $2.50 for four foot of it, which compares very favorably with "official" pen blanks, from some supplier for the "pen turning" wood workers. Judging by weight or mass, these may not truly be "hard wood" but they seem better than ordinary dowels, in terms of probable strength / mass. And they look a lot nicer than ordinary dowels, so they're an upgrade to the above. 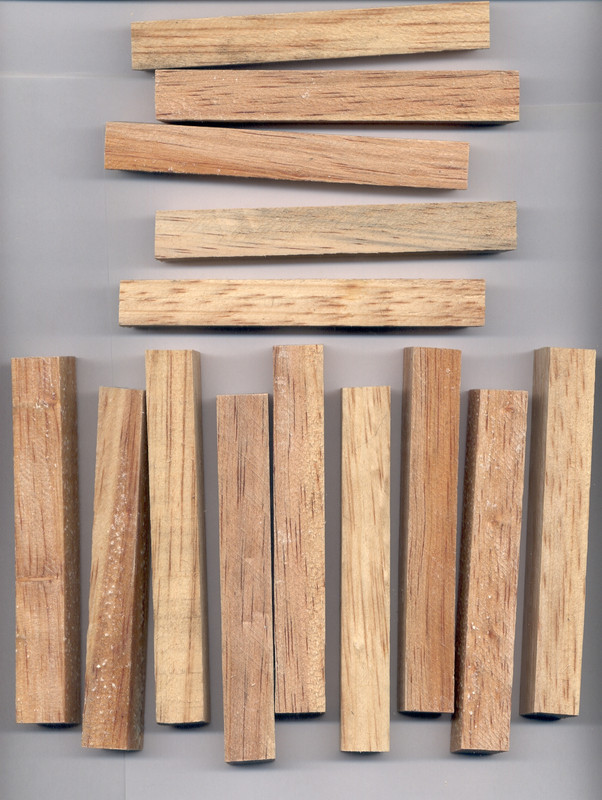 Last up (for tonight) is this image, which shows another idea I had, for possible ("possible") sculpting handles. I was thinking of sections of this as inner reinforcements, for wooden handles that I'll lathe-turn, but the larger diameter sizes don't bend super-easy (when you don't want them to, I mean) so they could be used, mainly as-is. 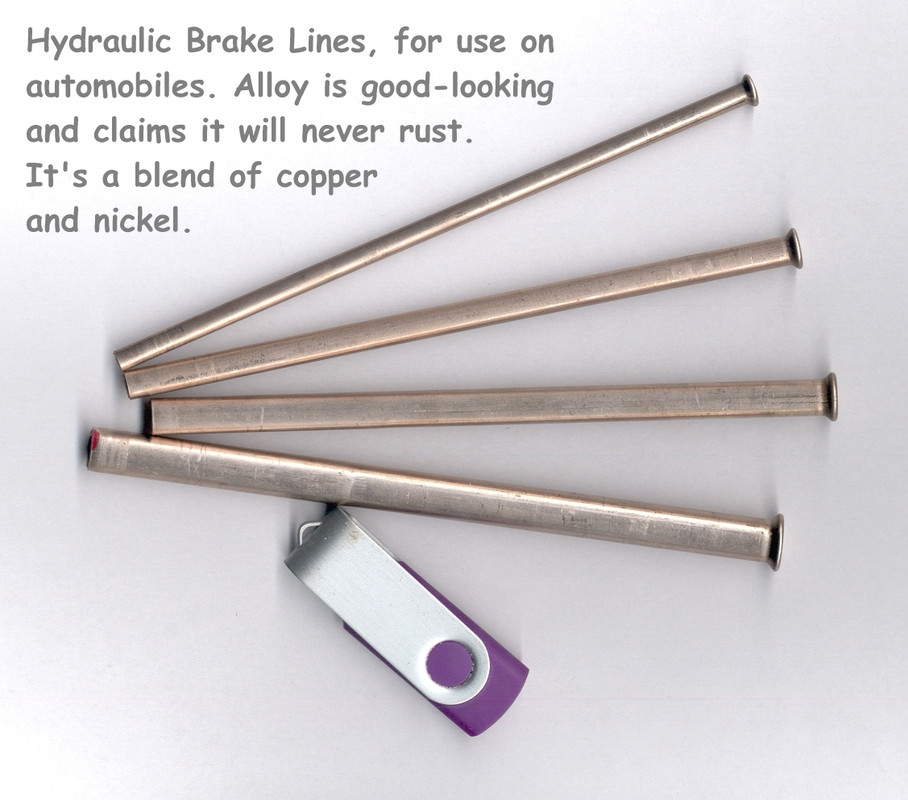 Not shown is the even goofier idea of using a piece of household water line, as a possible "handle". It's made of a type not legal in California, so I doubt some of you guys would have seen it. It's basically a super-ridiculously-strong plastic, called "pex" and the section I got ahold of, at that same Tractor Supply store, was blue in color. |
|
|
|
Post by jcon on May 23, 2021 9:37:16 GMT -5
Well sir I believed all along you were a sculptor, not just car bodies but the tools you created and are creating... carry on, I'm watching!!!
|
|
|
|
Post by wardster on May 24, 2021 23:27:21 GMT -5
Well sir I believed all along you were a sculptor, not just car bodies but the tools you created and are creating... carry on, I'm watching!!! Thanks again! You're too kind! There may be a "bonus" kind of item coming up, but it has little to do with this model, so I'll just mention it in passing. I used to write for a publication out of England, called "Sci-Fi and Fantasy Modeller". They went out of business, a few years back, and the deal all along (for writers like me, I mean) was that the rights to what I was submitting to them (photos, words, etc.) reverted to me, after they published that stuff ... but, there was always a bit of gray area, in that they had (while they were still in print, and so on) hoped that if they ever did something like a "greatest hits" issue, or something, that they could use that stuff, for that, a second time. They also hoped, back then (but didn't demand) that we writer types please not compete with the "printed" version while it was on newsstands, and for a year or two after that. Legally, the rights went back to being mine, right after publication that first time (or so I recall it all, now; and likely have some emails from back then, to clarify) ... but, anyway, just to be extra-super-careful, and also to try to be as cool as possible about how I'm treating the guys that used to run that publication, I asked my former editor, Andy Pearson, to relay a message (and he did that) and I got a reply back. Yes, it appears that I can do stuff like scan in the actual pages of some of my old articles, and share that stuff with others -- a couple such builds were arguably (pretty straight-forward, not really all that subtle) of cartoon-oriented builds. And some were, arguably, "sculptor - related". Two of the latter, I've wanted to share with others, for a long time ... and now I can. Or at least, once I find the time to scan in those pages (I might have to destroy the bindings on those "perfect bound" issues, to accomplish it) it appears that I can (somehow, some way) share that stuff with other people, who might be interested in it. Some details are still "in flux" ... but I'm stoked that the guys I used to love writing for, are being extra cool about all this. And they seem pretty happy with me, too: I suspect a lot of people would have just "done it" without making sure all was well... The stuff that's way off-topic, for this site, of course I won't post here. And I might not be able to "post" it, period ... but for the guys that wanted to see that stuff, I'll figure something out. Maybe uploading zip files to a temporary storage place? The two articles (one from 2010, another from 2013) that I really want to post, or make available in some way (both here and perhaps, if I can find a way to do it, that feels right, maybe also over on a sculpting-related forum on Facebook that I'm a new member of: the one run by the Shiflett Brothers?) ... anyway, they're articles on how to weld plastic kit pieces together, with a special tool, and a custom-ground tip for it, that I made, way back when. In the first such article, I repaired doggie-chewing damage to a vintage sci-fi kit (the evil robot, Maximillian, from the 1980's movie, The Black Hole) and did some accurizing on that kit, while I was at it ... and the second article showing that "welding plastic with heat" technique showed a VW Beetle's body being turned into a replica of something a studio had once done, over there in England: turning it into a space-capable vehicle, for a TV show that had space aliens as cops, alongside humans. ("Space Precinct" was the show's name, if memory serves? It's been a little while, since 2013, when I wrote that article!) I still have, I think, most or all of the original photos I took (and likely the original words I had submitted) that show a RADICAL transformation of that random (non-toon) Beetle. There are so many "cracked" kits, that could benefit from techniques like that ... not to mention, monstrous re-sculpting jobs a person could do, on the kinds of kits we all love so much. I particularly like that butt joints, on things like styrene sheets, do not need a "patch panel" or some kind of external (internal?) reinforcements, if/when a person can just weld it all together. I suspect the "military aircraft" guys, who do radical conversions, and maybe the "military armor" guys, as well, would love to know about such techniques. And now, thanks to the publishers / editors over at Sci-Fi and Fantasy Modeller being cool, I know I won't be offending them, or hurting their interests, or anything, if/when I get organized, and can share such articles. There's also some other stuff going on, that was taking up some of my time, over the past month ... but things are winding down, again. I'm getting more and more "chomping at the bit" to get back to this project ... so I definitely haven't forgotten this one. It's just been a "snail's pace" on updates, for the past month or so. (Which is kind of normal for me, all too often!?) Anyway ... I'm stoked to think I can share those two articles, in particular. It might take a while, but that's the plan. Worst case deal, I can put some files on something like DropBox, or similar, and guys here can PM me, to see where it's located. |
|
|
|
Post by jcon on May 24, 2021 23:40:19 GMT -5
Looking forward to seeing them!!!
|
|
|
|
Post by wardster on Jun 30, 2021 2:32:06 GMT -5
Apologies, guys, for my "not being around, all that much, of late". I won't go into details, but Real Life up and went completely ballistic on me for a while. Things are just now settling back down. I have gotten in some hobby time, here and there ... but not yet on this one project. If anyone here want's to see some of the other silliness (and/or nerdiness) I've posted, elsewhere, I signed up as "Ward Ess" over on Facebook, so that I could be a member of a few cool modeling groups (where I'm sure learning a lot!) over on Facebook's "Groups" section. (Actually, at first I only signed up for one, but things snow-balled.) If anyone's interested, here's a list of where I've been posting stuff, over the last month or so ... just look up that name, above, in the member's section for each of these groups; and you'll see the stuff I've posted there. "Shiflett Brother's Sculpting Forums" www.facebook.com/groups/1114208771968434/"Sci-Fi / Fantasy Scratchbuild and kitbash modeler" group www.facebook.com/groups/2043682082594379/"Shampoo Bottle Space Ships" group www.facebook.com/groups/345236885637120"Foam Modelling Workshop" group www.facebook.com/groups/foamworkshop/I'm learning oodles of new-to-me stuff, in those places, which is what's keeping me interested. I'm going to have to push that temporary excitement aside, though, and try to get some work done, to finish up this half-hull test model. Amongst the stuff I posted links to, in those places, are those two articles I mentioned from 2010 and 2013, and also what I suppose I could call an "unreleased article" (of a sort) about trash-bashing together some fictional land vehicles (work I did a decade ago now) that began as deodorant containers, that I had "welded together" ... |
|
|
|
Post by jcon on Jul 3, 2021 16:02:17 GMT -5
Glad to have you back brother!
|
|
